Learn robotics and coding with Pybricks
Pybricks is the all-in-one app for coding smart LEGO devices. But where do you begin if you’re new to LEGO robotics and coding? If that’s what you’ve been wondering, then this guide is for you.
- Been here before? Jump back in using the left hand menu.
- In a hurry? Go directly to the installation instructions.
What is Pybricks?
Pybricks makes your smart LEGO bricks come alive. Get creative and gradually learn to build and code sophisticated and fun machines. Check out our videos to see what you can make!
Why Pybricks?
Pybricks makes all of your smart LEGO bricks just work. Pybricks is designed to be very useful, practical – and most of all – fun.
Whether you’re just getting started, or a seasoned builder looking to build something big, Pybricks is for you. It helps robotics teams get better results, while allowing enthusiasts to combine and mix all their battery-powered LEGO bricks creatively for endless possibilities.
Made by long-term LEGO enthusiasts, Pybricks not only unifies all the different LEGO themes, but also unlocks the full possibilities of each set and allows you to use it far beyond its original lifespan, even as the original apps get discontinued.
Pybricks for robotics teams
Coding a robot is fun, but there is a lot to learn, especially at first. You can think of Pybricks as a really useful tool. A good tool doesn’t do the job for you, but it certainly makes it more practical.
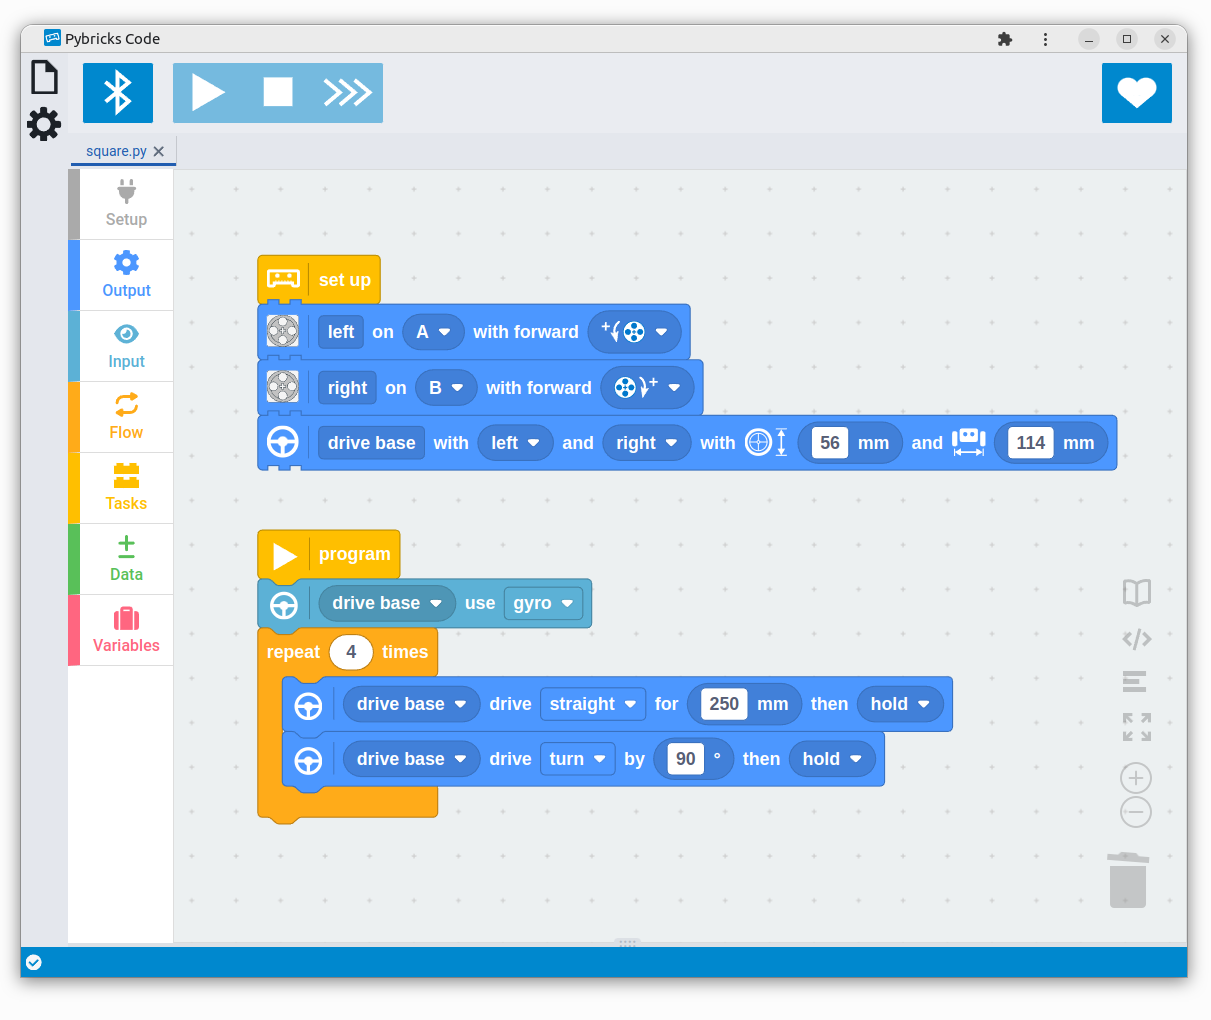
Pybricks was specifically designed with robotics in mind. This means you’ll get accurate and to-the-point blocks for robot navigation for example, with support for the gyroscope built in.
You’ll need fewer blocks to do the same thing. When you do need a lot of blocks, you can break it down into separate functions or files so your team members can work and learn together.
Or, as one team coach puts it:
“The kids were able to code a mission in 20 minutes with Pybricks that had taken at least an hour to code previously.”
Even now, we’re continuing to improve Pybricks specifically for this purpose, based on feedback from students and coaches from around the world. We’re proud to play a small part in the learning journey for many teams, such as this one:
“In addition to being the tournament Champion, we also won the Robot Performance award. We know the main reason that we achieved the top robot score is because of all the features built into Pybricks.”
Lego Legends FLL Team (2024 Oregon State Champions)
Pybricks for LEGO enthusiasts
Building with LEGO has always been about being creative and combining elements to build amazing things. But with the recent battery-powered interactive sets, the play experience is often limited by what you can do using the app for that set.
That way, LEGO Technic has become all about remote control using a phone screen, LEGO train hubs are reduced to remote controlled battery boxes, SPIKE is limited to certain classroom activities, and MINDSTORMS was discontinued alltogether.
And yet, despite the differently colored plastic casing, they’re all pretty much the same system on the inside. Pybricks bridges the gap across these themes, letting you use your LEGO elements as creatively as intended!
More to the point: With Pybricks installed on your Technic Hub or City Hub, it works just like SPIKE or MINDSTORMS. So now you can save a program on the hub. It runs all by itself, without needing a phone or tablet connection all the time:
“Pybricks is a powerful platform that delivers what LEGO has so far been unable or unwilling to: complete compatibility across the entire Powered Up ecosystem, and a means to download your program onto any hub and have it run as soon as it is switched on.”
Throughout this guide, you’ll use a very basic “robot” to illustrate the core principles. This is quick to build, and great for learning. Even if your end goal is to build a fully-automated cargo train station, just attach two motors and wheels to a hub for now and follow along. Once you’ve mastered the basics, you can apply it to any other design too!
How to follow this guide
The Pybricks learn pages you’re reading now are organized just like a book. Beginners can read them from start to finish. More seasoned builders can browse to their favorite topics right away. Just go back if you feel you’re missing some background.
Use the table of contents on the left to navigate to each chapter. The menu on the right helps you track your progress through the current chapter.
What prior knowledge do I need?
No prior coding experience or LEGO building experience is required. There’s no need to use other coding apps first either. You’ll start with the basics and build from there gradually.
Pybricks block-based coding is designed to be very close to real-world, text-based coding. If you proceed to experiment with Python after following this block-based coding guide, you’ll find that all skills you gained along the way are immediately applicable to Python too.
Design challenges and lesson ideas
To help you better understand the concepts introduced throughout each chapter, you’ll find several challenges and puzzles to practice your skills throughout. You’ll also find suggestions for classroom activities.
While some challenges include hints or partial solutions, we encourage you to get creative with the open ended problems. You can also share and discuss your solutions on our forum.
Chapter overview
This guide is broken down into several main parts. We start with the basics, and gradually build on the skills you learn throughout.
1. Getting started
This chapter is all about preparing the tools you need to get started. What is a hub, motor, or sensor? You’ll also prepare your computer or tablet and install Pybricks on your LEGO hub.
You’ll learn how you create, save, and run programs. Without diving into the details of each block just yet, you’ll learn how to use the coding interface effectively, which is a big help once you create bigger programs later on.
- 1.1: What do you need?
- 1.2: Installing Pybricks
- 1.3: Running Pybricks programs
2. Building a robot
A great way to learn robotics and coding principles is to build a basic vehicle robot. It’s a fun way to dive into the action right away, while getting to know all the elements and coding techniques one by one.
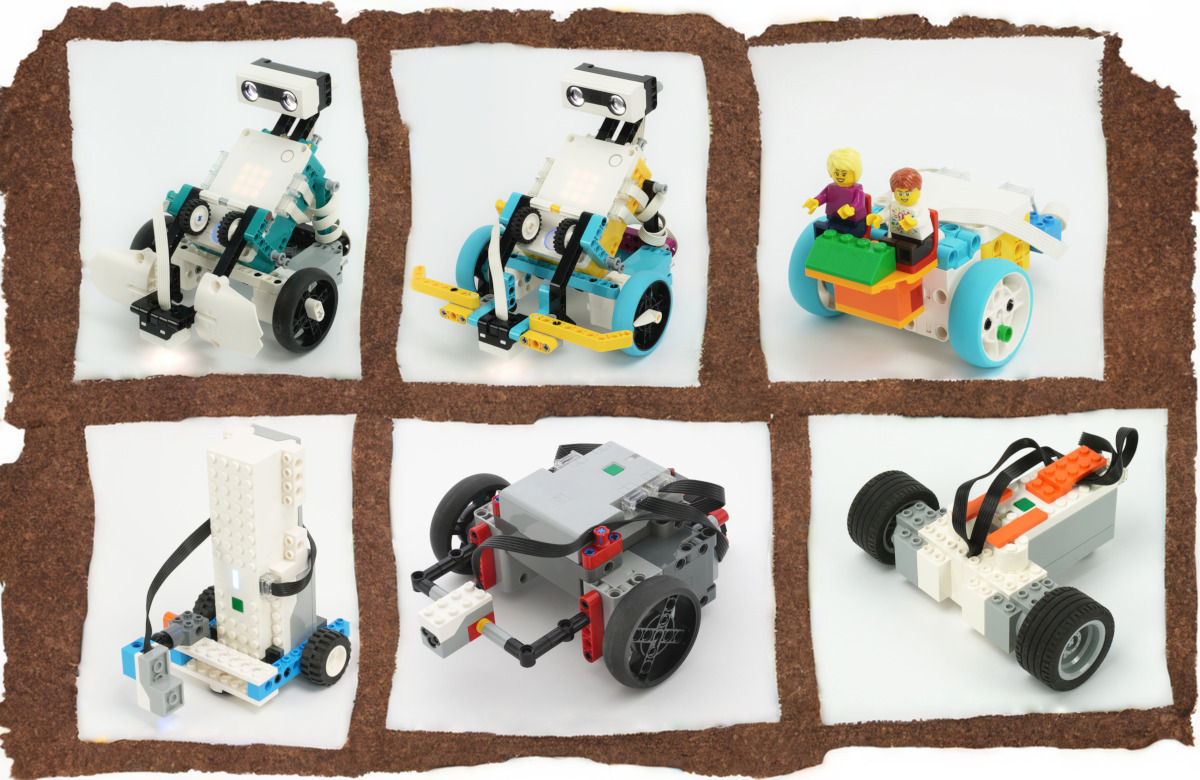
We’ll show you how to build such a vehicle. You can use either SPIKE Prime, SPIKE Essential, Mindstorms Robot Inventor, Technic, City, or BOOST. Once you’ve attached some wheels to the motors, it turns out they’re all pretty much the same.
- 2.1: Building StarterBot
- 2.2: SPIKE Prime
- 2.3: SPIKE Essential
- 2.4: MINDSTORMS
- 2.5: Technic Hub
- 2.6: BOOST Move Hub
- 2.7: City Hub
You can also use your own robot if you prefer, by adapting the provided coding examples to your own design. For example, you might have to adjust the wheel diameter parameter if you use differently sized wheels.
3. Basic robot navigation and output blocks
Now it’s time to make the robot come alive! You’ll learn to use the output blocks to make your robot move, play sounds, and blink lights. Naturally, you’ll make a “Hello, World!” program too!
- 3.1: Your first robot program
- 3.2: Essential coding tools
- 3.3: Basic robot navigation
- 3.4: Adding sound and light
4. Waiting, repeating, and tasks
Robots rarely execute a long, fixed list of actions from start to finish. This chapter shows you how to wait between actions, or repeat several actions multiple times. You’ll also see how you can run multiple actions in parallel, or how to group frequently used actions together in a dedicated task.
- 4.1: Waiting and repeating
- 4.2: Making your own task blocks
- 4.3: Multitasking essentials
- 4.4: Advanced multitasking
5. Making decisions with sensors
Robots don’t operate in the world all by themselves, so they need to observe their surroundings to decide what to do. This chapter shows you how to use sensors to make decisions. You’ll use the distance sensor to get started, and make your robot drive around while avoiding obstacles.
A single sensor is quite easy to use, but most robots use several sensors at the same time. How do you combine all the sensor information to do something useful? And how do you avoid missing important information? You’ll find out in this section. You’ll use the buttons on the hub as additional sensors, so that it can not only detect objects, but also where they are encountered.
6. The color sensor
Some of the remaining chapters are a work in progress. Please check back in a few months. Thank you!
This chapter shows you how to measure light intensity and color. Your robot can use these measurements in many ways. For example, you’ll learn how to make your robot find the brightest spot in a room, and how to make it follow a line on the floor. You’ll also learn to calibrate the color sensor to make it work reliably by adapting to your environment.
7. Using motors effectively
Rotating a motor might seem like a trivial task, but there are many factors that influence how it moves. This chapter dives deeper into the motor blocks and its various configurable settings. You’ll learn how to adjust motor speed, acceleration and control how the motor stops. You’ll also learn why some of these techniques are useful in different scenarios.
8. Navigation with the gyro sensor
In addition to using the position sensors in the motors, you can use the gyroscopic sensor in the hub to navigate more effectively. This chapter shows you how this works. You’ll also learn about practical aspects of using the gyro sensor, such as calibration or combining it with other navigation tasks. We’ll also discuss the pitfalls to watch out for when using the gyro in a robot competition.
9. Creating and using variables
So far, you’ve made your robot respond to its environment right away by adjusting what it does based on the sensor values at that moment. In some applications, you’ll want to remember certain values so you can use them later on in your program. You’ll learn to do that using so called variables.
10. Creating and using tasks and functions
In earlier chapters, you’ve briefly explored the use of tasks to group portions of code that could be reused repeatedly. This chapter dives deeper into the use of such tasks, also known as functions. Not only will they execute things for you, but functions can also calculate things for you and give you the result to use as an input for another block.
11. Using lists and iterations
A variable can store a single value, but it can also store a list of multiple values. For example, you might have a list of target angles that the motor should go to, one by one. This chapter shows you how to create, and modify such lists. You’ll also learn how to iterate through the list. This lets you execute some actions for each value in the list.
12. Wireless communication
At this point, you’ve mastered nearly all of the blocks on the block palette, but the fun doesn’t end there. In this chapter we’ll show you how you can send values between two or more LEGO robots. This lets you build a bigger robot, or make multiple robots work together.
13. Your phone as a smart sensor
The sensors that come with your LEGO set are simple and effective, but they are limited in what they can measure. Did you know there’s a perfectly good sensor in your pocket? In this chapter you’ll learn to use your computer camera or your phone as a smart sensor to add vision and intelligence to your creations.
- 13.1: How to use smart sensors
- 13.2: Image classification
- 13.3: Line following