Jekyll2024-08-06T17:47:15+00:00https://pybricks.com/feed.xmlPybricksPybricks lets you code your LEGO® creations to make them come alive. Learn to build and code your own creations, or follow along with our tutorials. Pybricks works with LEGO MINDSTORMS, SPIKE Prime, LEGO Technic, LEGO City Trains, LEGO Boost, and more.Laurens ValkUsing Pybricks on Linux2024-07-01T00:00:00+00:002024-07-01T00:00:00+00:00https://pybricks.com/project/pybricks-on-linux
You can create programs on
Windows 10 or 11, macOS, Linux, Android, or ChromeOS. This page covers the
additional configuration you’ll need to use Pybricks effectively on Linux.
The Pybricks developers use Linux daily, so we definitely wanted to make sure
this works well!
If you use the web-based interface, we recommend using Chromium. You can
install it using your preferred package manager. On Ubuntu for example, you
can do:
sudo snap install chromium
Google Chrome works as well. Other Chromium-based web-browser may or may not
support Web Bluetooth. Notably, Opera, Vivaldi and Brave do not support Web
Bluetooth.
Web Bluetooth is not officially supported on Linux and requires Experimental
Web Platform features to be enabled. Copy and paste the following in the
address bar, set it to Enabled and restart the browser.
If you use Chromium as a snap package, you may get an error when you try to
install the firmware on a SPIKE Prime, SPIKE Essential, or MINDSTORMS Robot
Inventor hub via USB. To resolve this, enable access to USB devices:
sudo snap connect chromium:raw-usb
Adding udev rules on Linux
This step is only needed for LEGO hubs with USB, such as SPIKE Prime, SPIKE
Essential, and MINDSTORMS Robot Inventor.
By default, Linux does not allow the use of unknown USB devices, so you need to
add udev rules for your hubs. Pybricks provides a couple of ways to do this.
If you are using an Ubuntu-based Linux distro, you can install the
pbrick-rules package from the Pybricks PPA. This method has the advantage of
automatic updates.
You can alternately install the rules using the pybricksdev command line tool:
pipx run pybricksdev udev | sudo tee /etc/udev/rules.d/99-pybricksdev.rules
If neither of these options is suitable, you can manually copy this
file
to /etc/udev/rules.d/99-pybricksdev.rules.
After installing the udev rules, disconnect any affected devices and plug them back in.
If this doesn’t seem to work, try rebooting.
]]>Laurens ValkUsing Pybricks with Visual Studio Code and other editors2024-07-01T00:00:00+00:002024-07-01T00:00:00+00:00https://pybricks.com/project/pybricks-other-editors
You can create programs on
Windows 10 or 11, macOS, Linux, Android, or
ChromeOS. The simplest way to get started is to use the web-based Pybricks Code
editor at code.pybricks.com.
You can also use your preferred local editor. On this page, we’ll show you how.
This guide is for Powered Up hubs.
If you are using Pybricks on LEGO® MINDSTORMS® EV3, we recommend using the
official LEGO® MINDSTORMS® EV3 MicroPython extension for Visual Studio Code.
Everything you need to know from how to install the extension to how to create
a new project is detailed in the official docs.
Running Pybricks scripts from the command line
Instead of a full-fledged extension for a specific editor, we’ve created a
generic command line utility called pybricksdev that you can use to run
programs on the LEGO hubs. In turn, you can integrate this tool with your
favorite editor.
If you plan to use Visual Studio Code or a similar editor, skip this manual
approach. We’ll do it as part of a bigger installation later in this article.
Since pybricksdev is just a Python package, you can install it with
your favorite Python package manager. If you have
pipx
for example, you can do:
pipx install pybricksdev
Once installed, you can run programs from the command line as follows. Replace
my_program with the actual name of the program you want to run.
pybricksdev run ble my_program.py
If you have more than one active hub, you can specify a specific hub by name:
pybricksdev run ble --name "my hub" my_program.py
Pybricksdev will try to connect to the hub, download the program, and start it.
It disconnects when the code completes. This approach has some minor
inconveniences that you should be aware of:
Since it doesn’t stay connected, the hub will turn off after being idle for a
few minutes. Just turn it on again with the button.
You cannot stop the program from within Visual Studio Code, so you’ll have to
use the hub button to stop it.
Using Pybricks with Visual Studio Code
The pybricksdev command line tool does not require that you use any
particular editor, but you can set up an editor to make running code more
convenient. We’ll show you how to do it for Visual Studio Code, but the steps
may be similar for other editors.
First, make sure Python is installed. You can install Python from the official
site, or using your favorite package manager. On Linux, Python is most
likely already installed, but you will also need the venv package:
sudo apt install python3-venv
Now install the Pylance extension. Search for Pylance on the Extensions
tab in Visual Studio Code and click Install to install.
Setting up a virtual environment
Once Python and Pylance are installed, you can use Visual Studio Code to
set up an isolated virtual environment.
Create a new project by simply creating a new, empty folder on your computer
and opening that folder in Visual Studio Code.
Use F1 or (⌘+⇧+P on macOS) to
open the command palette in Visual Studio Code.
Type in py create env to search for Python: Create Environment and select
that option.
It will ask you to “Select and environment type”. Choose Venv.
It will ask you to “Select Interpreter”. Choose the one that says *Global*.
There will now be a new subfolder in your project named .venv that contains
the virtual environment and Visual Studio Code should set it as the
interpreter to use for your project.
To use the virtual environment, open the command pallette again and search
for py create term and select Python: Create Terminal.
This should open a new terminal and present a prompt that starts with (.venv),
if all went well.
Instead of following the steps above, you can also do it on the command line
using:
# Windows PowerShell
py -3 -m venv .venv
.venv/scripts/activate
Installing the pybricks package
Once you have a (.venv) prompt as described in the previous section, you can
install the pybricks package by typing the following in the terminal with the
(.venv) prompt:
pip install pybricks
Then you need to restart the Python language server to pick up the new package.
In the command pallette, search for “py restart” and select Python: Restart
Language Server.
Now code completion and intellisense should be working. You can try it by
opening an existing file and hovering over text to see the relative
documentation or you can create a new .py file and start typing from
pybricks. and see suggestions on what comes next.
Downloading and running programs
Install the pybricksdev package in the virtual environment:
pip install pybricksdev
You can test that it works using the commands described earlier.
It works the same, but now it runs from within your virtual environment.
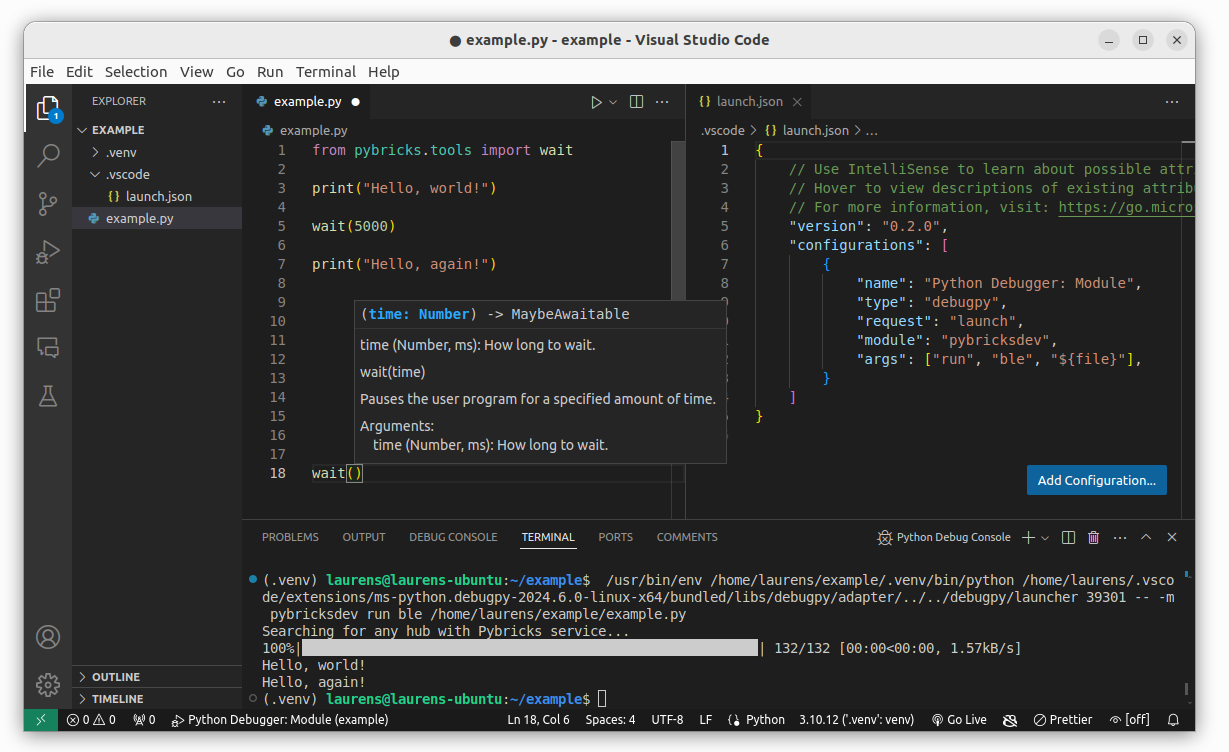
To get your program started with F5 or CTRL+F5, create a run configuration.
Create a folder called .vscode and add a file called launch.json with the
following contents:
You can now run an opened Python program with F5. The full setup, including
an example with code highlighting of Pybricks commands is shown below.
Running Pybricks programs with Visual Studio Code via pybricksdev.
Common mistakes
Clicking any of the “run” buttons in Visual Studio Code will try to run the
program on your computer instead of downloading and running it on the hub. When
you do this, it may appear as nothing happened or if you didn’t install the
pybricks package, you might get an error that the pybricks package could
not be found. Be sure that you follow the steps above to download and run a
program with F5 or the green play button on the debug tab.
]]>Laurens ValkPlaying Tic Tac Toe with SPIKE Essential2024-06-11T00:00:00+00:002024-06-11T00:00:00+00:00https://pybricks.com/project/spike-essential-tic-tac-toeA good way to practice more interesting coding concepts is to mimic a well
known board game. There’s no stress to get a robot mission right, and it’s
easy to check if your code behaves according to the rules of the game.
In this article, we’ll show you how you can make Tic Tac Toe game for two
players!
However, you can build it with any hub if you combine it with the Color Light
Matrix to display the game.
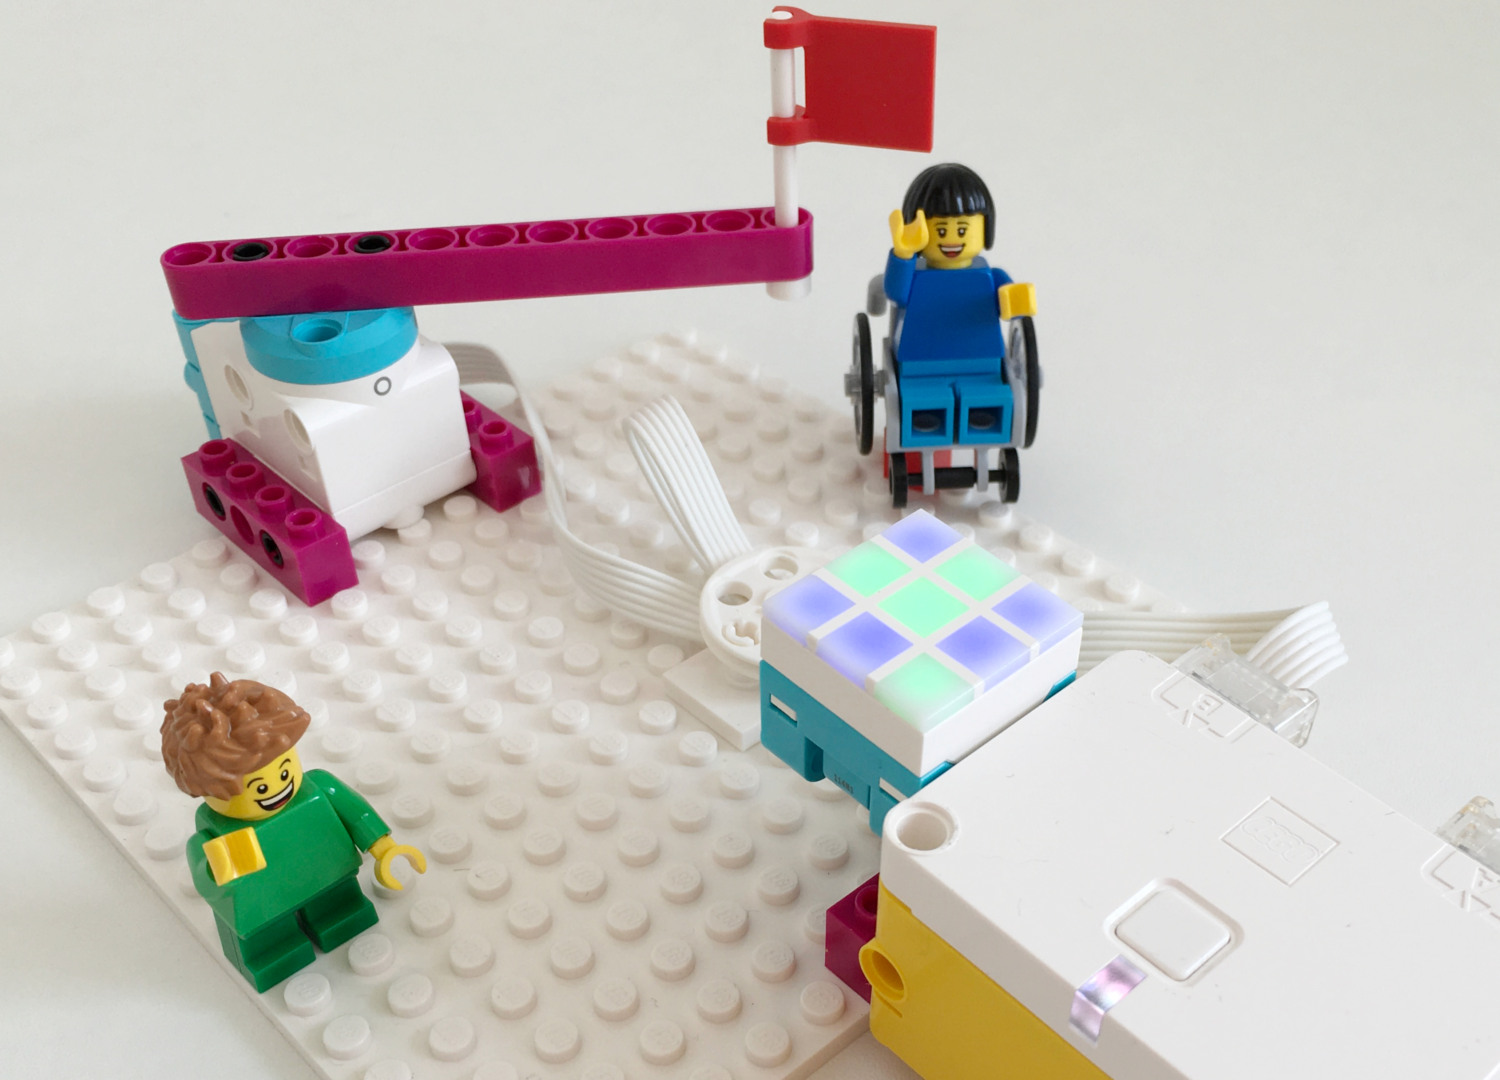
To build, place the motor and the hub on the base plate using some bricks and
pins, as shown above. Add a beam to the motor to indicate whose turn it is.
Running and playing the game
Instead of noughts and crosses, you’ll use the blue and green colors
to indicate each player’s turn on the SPIKE Color Light Matrix.
You’ll use the hub button to choose your position, and then confirm your choice
by handing the flag to the other player for their turn. You can see this in the
video above.
The example below includes numerous comment blocks to help you illustrate how
this program works. Have fun!
The Tic Tac Toe program.
Running the Pybricks program
This project uses Pybricks on your LEGO hub. Pybricks makes your creations
come alive and helps you unlock the full potential of your LEGO Technic,
City, MINDSTORMS, BOOST, or Spike sets.
If you haven’t already, install Pybricks on your hub as shown below, or check
out our getting started guide for more details. You can go
back to the LEGO firmware and apps at any time.
Tools
Install
Now import the program you downloaded earlier, as
shown below. Click to connect your hub and ▶ to
start!
files
import
open
connect
run
You can run imported block programs even if you’re not signed up. This is a
great way to try out Pybricks and see how it works.
Running it as a Python program
You can also run this project as a Python (MicroPython) program. The following
code was generated from the block program above.
To run it, create a new empty Python program in Pybricks and copy the code into
it.
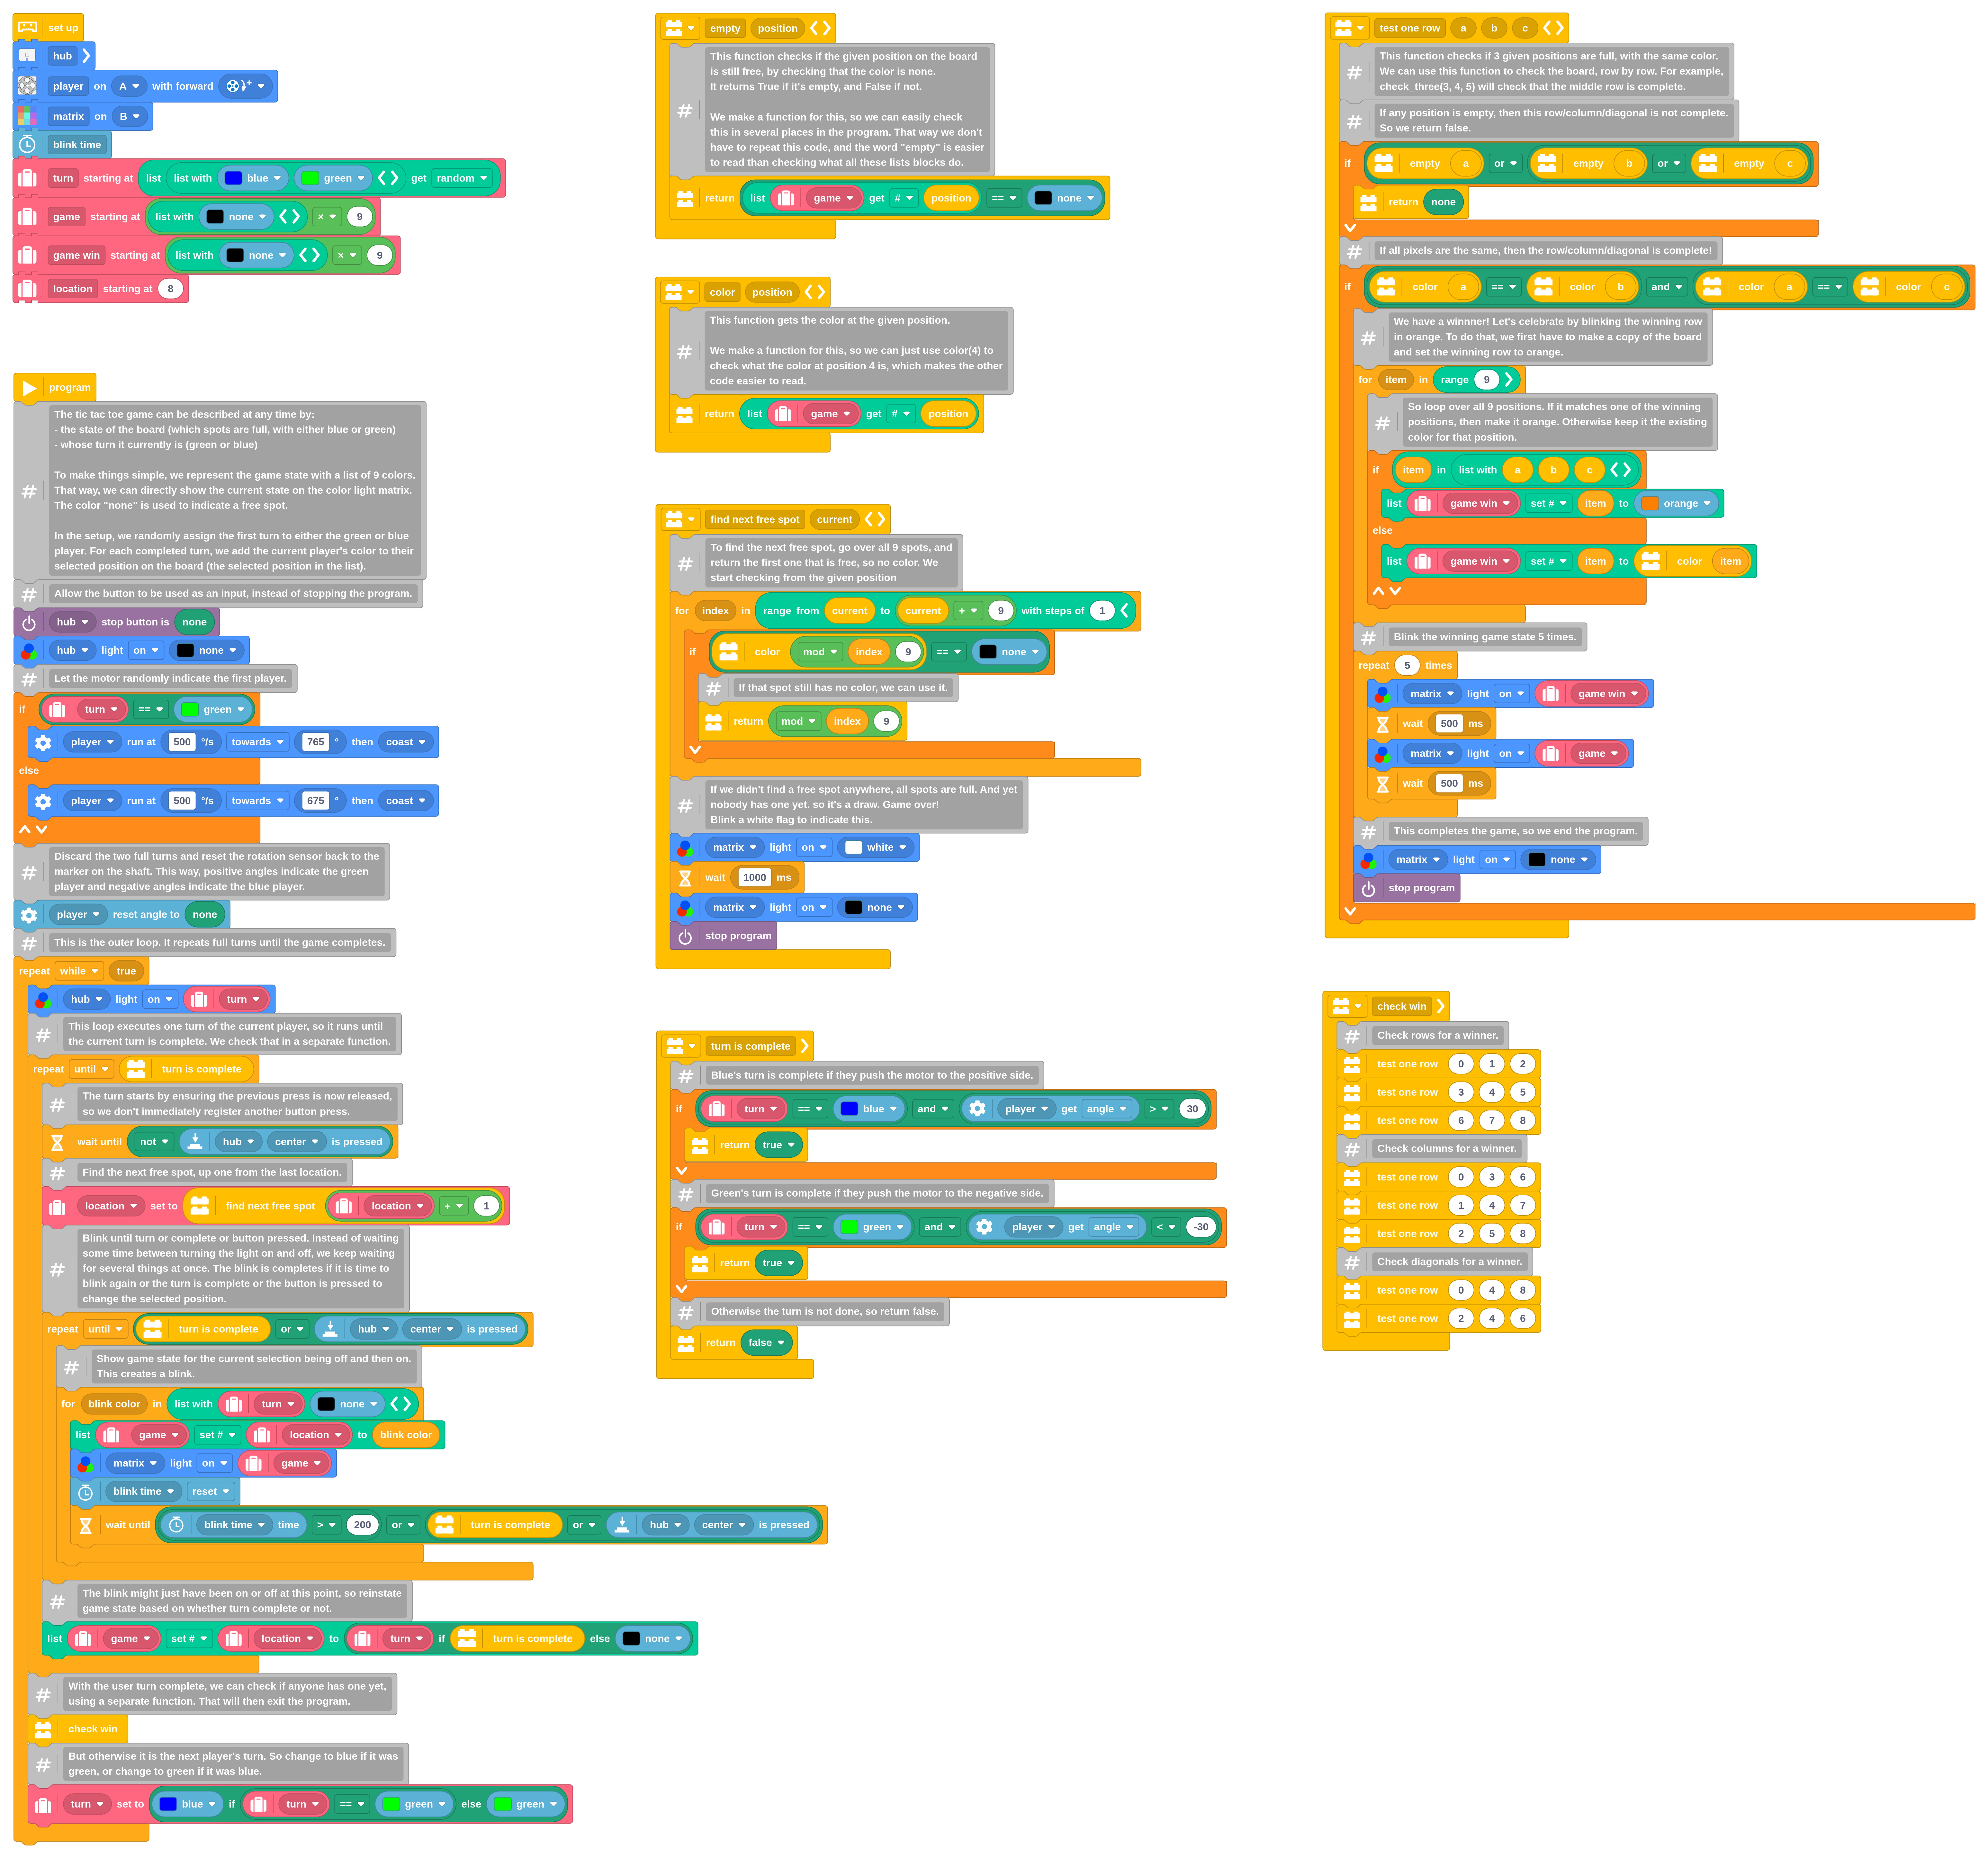
frompybricks.hubsimportEssentialHubfrompybricks.parametersimportButton,Color,Direction,Port,Stopfrompybricks.pupdevicesimportColorLightMatrix,Motorfrompybricks.toolsimportStopWatch,waitfromurandomimportchoice# Set up all devices.
hub=EssentialHub()matrix=ColorLightMatrix(Port.B)blink_time=StopWatch()player=Motor(Port.A,Direction.CLOCKWISE)# Initialize variables.
turn=choice([Color.BLUE,Color.GREEN])game=[Color.NONE]*9game_win=[Color.NONE]*9location=8defempty(position):# This function checks if the given position on the board
# is still free, by checking that the color is none.
# It returns True if it's empty, and False if not.
# We make a function for this, so we can easily check
# this in several places in the program. That way we don't
# have to repeat this code, and the word "empty" is easier
# to read than checking what all these lists blocks do.
returngame[position]==Color.NONEdeftest_one_row(a,b,c):# This function checks if 3 given positions are full, with the same color.
# We can use this function to check the board, row by row. For example,
# check_three(3, 4, 5) will check that the middle row is complete.
# If any position is empty, then this row/column/diagonal is not complete.
# So we return false.
ifempty(a)orempty(b)orempty(c):returnNone# If all pixels are the same, then the row/column/diagonal is complete!
ifcolor(a)==color(b)andcolor(a)==color(c):# We have a winnner! Let's celebrate by blinking the winning row
# in orange. To do that, we first have to make a copy of the board
# and set the winning row to orange.
foriteminrange(9):# So loop over all 9 positions. If it matches one of the winning
# positions, then make it orange. Otherwise keep it the existing
# color for that position.
ifitemin[a,b,c]:game_win[item]=Color.ORANGEelse:game_win[item]=color(item)# Blink the winning game state 5 times.
forcountinrange(5):matrix.on(game_win)wait(500)matrix.on(game)wait(500)# This completes the game, so we end the program.
matrix.on(Color.NONE)raiseSystemExitdefcolor(position):# This function gets the color at the given position.
# We make a function for this, so we can just use color(4) to
# check what the color at position 4 is, which makes the other
# code easier to read.
returngame[position]deffind_next_free_spot(current):# To find the next free spot, go over all 9 spots, and
# return the first one that is free, so no color. We
# start checking from the given position
forindexinrange(current,current+9,1):ifcolor(index%9)==Color.NONE:# If that spot still has no color, we can use it.
returnindex%9# If we didn't find a free spot anywhere, all spots are full. And yet
# nobody has one yet. so it's a draw. Game over!
# Blink a white flag to indicate this.
matrix.on(Color.WHITE)wait(1000)matrix.on(Color.NONE)raiseSystemExitdefcheck_win():# Check rows for a winner.
test_one_row(0,1,2)test_one_row(3,4,5)test_one_row(6,7,8)# Check columns for a winner.
test_one_row(0,3,6)test_one_row(1,4,7)test_one_row(2,5,8)# Check diagonals for a winner.
test_one_row(0,4,8)test_one_row(2,4,6)defturn_is_complete():# Blue's turn is complete if they push the motor to the positive side.
ifturn==Color.BLUEandplayer.angle()>30:returnTrue# Green's turn is complete if they push the motor to the negative side.
ifturn==Color.GREENandplayer.angle()<-30:returnTrue# Otherwise the turn is not done, so return false.
returnFalse# The main program starts here.
# The tic tac toe game can be described at any time by:
# - the state of the board (which spots are full, with either blue or green)
# - whose turn it currently is (green or blue)
# To make things simple, we represent the game state with a list of 9 colors.
# That way, we can directly show the current state on the color light matrix.
# The color "none" is used to indicate a free spot.
# In the setup, we randomly assign the first turn to either the green or blue
# player. For each completed turn, we add the current player's color to their
# selected position on the board (the selected position in the list).
# Allow the button to be used as an input, instead of stopping the program.
hub.system.set_stop_button(None)hub.light.on(Color.NONE)# Let the motor randomly indicate the first player.
ifturn==Color.GREEN:player.run_target(500,765,Stop.COAST)else:player.run_target(500,675,Stop.COAST)# Discard the two full turns and reset the rotation sensor back to the
# marker on the shaft. This way, positive angles indicate the green
# player and negative angles indicate the blue player.
player.reset_angle(None)# This is the outer loop. It repeats full turns until the game completes.
whileTrue:hub.light.on(turn)# This loop executes one turn of the current player, so it runs until
# the current turn is complete. We check that in a separate function.
whilenotturn_is_complete():# The turn starts by ensuring the previous press is now released,
# so we don't immediately register another button press.
whileButton.CENTERinhub.buttons.pressed():wait(1)# Find the next free spot, up one from the last location.
location=find_next_free_spot(location+1)# Blink until turn or complete or button pressed. Instead of waiting
# some time between turning the light on and off, we keep waiting
# for several things at once. The blink is completes if it is time to
# blink again or the turn is complete or the button is pressed to
# change the selected position.
whilenot(turn_is_complete()orButton.CENTERinhub.buttons.pressed()):# Show game state for the current selection being off and then on.
# This creates a blink.
forblink_colorin[turn,Color.NONE]:game[location]=blink_colormatrix.on(game)blink_time.reset()whilenot(blink_time.time()>200orturn_is_complete()orButton.CENTERinhub.buttons.pressed()):wait(1)# The blink might just have been on or off at this point, so reinstate
# game state based on whether turn complete or not.
game[location]=turnifturn_is_complete()elseColor.NONE# With the user turn complete, we can check if anyone has one yet,
# using a separate function. That will then exit the program.
check_win()# But otherwise it is the next player's turn. So change to blue if it was
# green, or change to green if it was blue.
turn=Color.BLUEifturn==Color.GREENelseColor.GREEN
Python representation of the block program.
]]>Laurens ValkSimple wireless communication between MicroPython boards via Bluetooth (BLE)2024-06-03T00:00:00+00:002024-06-03T00:00:00+00:00https://pybricks.com/project/micropython-ble-communicationThe hub-to-hub communication feature in Pybricks MicroPython is not restricted
to LEGO hubs alone.
In this project, we will show you how to install a library that enables simple
wireless communication between any number of MicroPython boards that support
Bluetooth Low Energy (BLE).
If you just need to send small amounts of data, this can be a lot simpler than
setting up dedicated connections between the boards.
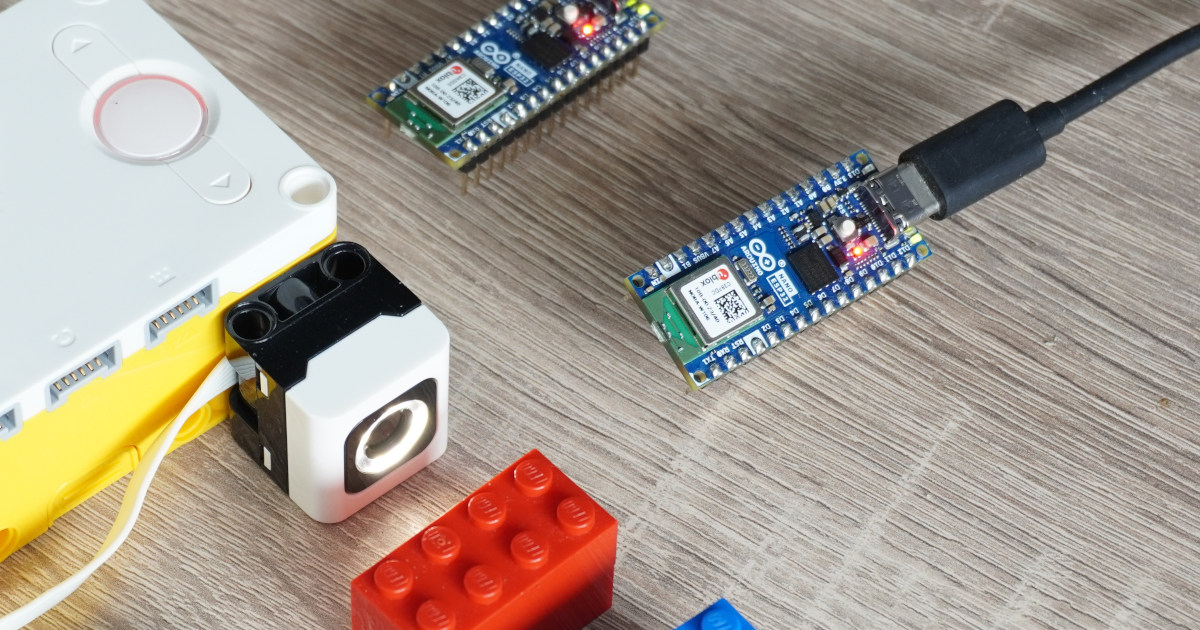
You can make BLE-enabled MicroPython boards exchange data easily.
How does it work?
Normally when you want to send data between two devices, you need to establish
a connection first. One device can “advertise” itself to describe what it can
do, and the other can “scan” for it.
This advertisement data normally contains information about the device, like
its name and services. Once a scanning device finds an advertising
device, they can connect and start sending data.
In the technique used here, we put the information we want to exchange in the
advertisement data instead. There isn’t much space in the advertisement data,
but it can be enough for simple messages. The advantage is that you don’t need
to establish a connection at all, but you can just keep looking for changing
advertising data and react to it.
We’ve made a library that does this for you, so you can simply send and receive
values without worrying about the details of the Bluetooth protocol.
What can you make?
This technique works great for broadcasting a few numbers or a small text
message. Since no explicit connection is required, any other BLE-enabled device
can scan for these messages and react to them.
This lets you make many-to-many communication networks like the one shown
below. Here, a LEGO hub measures a color and broadcasts it to all other boards
in the area that may be listening, which is two Arduino Nano ESP32s in this
case. They respond to the message by turning on the LED at the corresponding
color.
A similar example is shown below, where a LEGO hub broadcasts tilt and roll
data, which is used by the Arduino Alvik robot to drive around.
Installing the bleradio module
The communication tools come pre-installed on the LEGO hubs running Pybricks.
If you want to use this technique with other MicroPython
boards, install the bleradio library first. If you have mpremote, just do:
Alternatively, download
bleradio.py and copy it to your board.
What can you send?
Each hub can broadcast on one “channel” (0 through 255) and observe any number
of channels (each 0 through 255). The channel numbers are used to filter out
the messages you are interested in.
You can send signed integer values, floating point numbers, booleans, strings,
or bytes. Or a list/tuple of these objects.
For example, you can broadcast one of the following:
Boolean values are packed into one byte. All other types are packed into their
respective sizes plus one byte for the type.
Since advertisements payloads are limited to 31 bytes by the Bluetooth spec and
there are 5 bytes of overhead, the combined size of all type headers and values
is limited to 26 bytes.
When no data is observed, the observe method returns None. To stop
broadcasting, use broadcast(None).
The full specification is available in the protocol.
Example programs
Here is a simple example program that shows how to use the BLERadio class.
This example shows how you can broadcast data on on a channel and listen to
data on other channels at the same time.
fromtimeimportsleep_msfrombleradioimportBLERadio# A board can broadcast small amounts of data on one channel. Here we broadcast
# on channel 5. This board will listen for other boards on channels 4 and 18.
radio=BLERadio(broadcast_channel=5,observe_channels=[4,18])# You can run a variant of this script on another board, and have it broadcast
# on channel 4 or 18, for example. This board will then receive it.
counter=0whileTrue:# Data observed on channel 4, as broadcast by another board.
# It gives None if no data is detected.
observed=radio.observe(4)print(observed)# Broadcast some data on our channel, which is 5.
radio.broadcast(["hello, world!",3.14,counter])counter+=1sleep_ms(100)
You can make a variant of the program above and run it on a second board.
For example, you can make a program that observes the data on channel 5 and
prints it when it changes.
This example also shows the signal strength, which can be an additional piece
of information to help you roughly determine the distance between the boards.
Check out the GitHub
repository for more
examples, details, and discussion.
Mixing with LEGO Hubs
This communication technique is included in Pybricks by default. This means you
can use any existing program for inspiration.
It does not matter if the LEGO hub uses a Python program or a block-based
program. Wireless communication works the same way in both cases.
]]>Laurens ValkMaking your own Duplo Train controller2024-05-30T00:00:00+00:002024-05-30T00:00:00+00:00https://pybricks.com/project/control-the-duplo-trainThe Duplo train is a great toy. My kids really enjoy playing with the builtin
push-to-drive function and the colored action bricks.
There is also a tablet app that lets kids control the train remotely. But it
turns out you can do so much more, without adding more screen time for your
kids.
In this article, I’ll show you how you can build your own controller for
the Duplo train using LEGO City, Technic, SPIKE, or MINDSTORMS using Pybricks.
You’ll also find some step-by-step instructions to build a simple lever to
control the train, but we encourage you to get creative and build your own
controller. The possibilities are endless!
We’ve made several examples that make controlling the train motor almost as
easy as any other motor.
Requirements
To follow this project, you will need the following:
A modern Duplo train such as the LEGO Duplo Steam Train (10874)
or the LEGO Duplo Cargo Train (10875)
. You’ll know it’s the right one if it has a
light under the base next to the green button, which is normally used to scan
those colored action bricks on the track.
Any LEGO set with the City Hub, Technic Hub, SPIKE Prime Hub, SPIKE Essential
Hub, or MINDSTORMS Robot Inventor Hub.
Some motors or sensors to build interactive inputs for your controller, and
some bricks to put it all together.
Controlling the train
You’ll control the train using another LEGO hub that runs Pybricks. You can
see the basics in the video above.
The Duplo train itself doesn’t need any changes. It doesn’t run Pybricks.
Instead, this other LEGO hub running Pybricks connects to the Duplo train by
just sending the same Bluetooth commands that the tablet app normally would.
These commands to control the train aren’t included in Pybricks by default since
it is a fairly specific use case. But this is one of those cases where Pybricks
really shines: you can add an extra Python module and still easily use it in your
block programs.
Adding the Duplo module
First, download duplo.py and
import it into Pybricks using the “Import file” button at the top of the file
menu in Pybricks.
While you’re welcome to see what’s inside that file, you won’t need to understand
its contents to use it. Think of it as a module that provides a few functions
that aren’t normally available as Pybricks blocks.
Using the Duplo module
To use this new module, you can import the extra functions into your block
programs. Here’s an example:
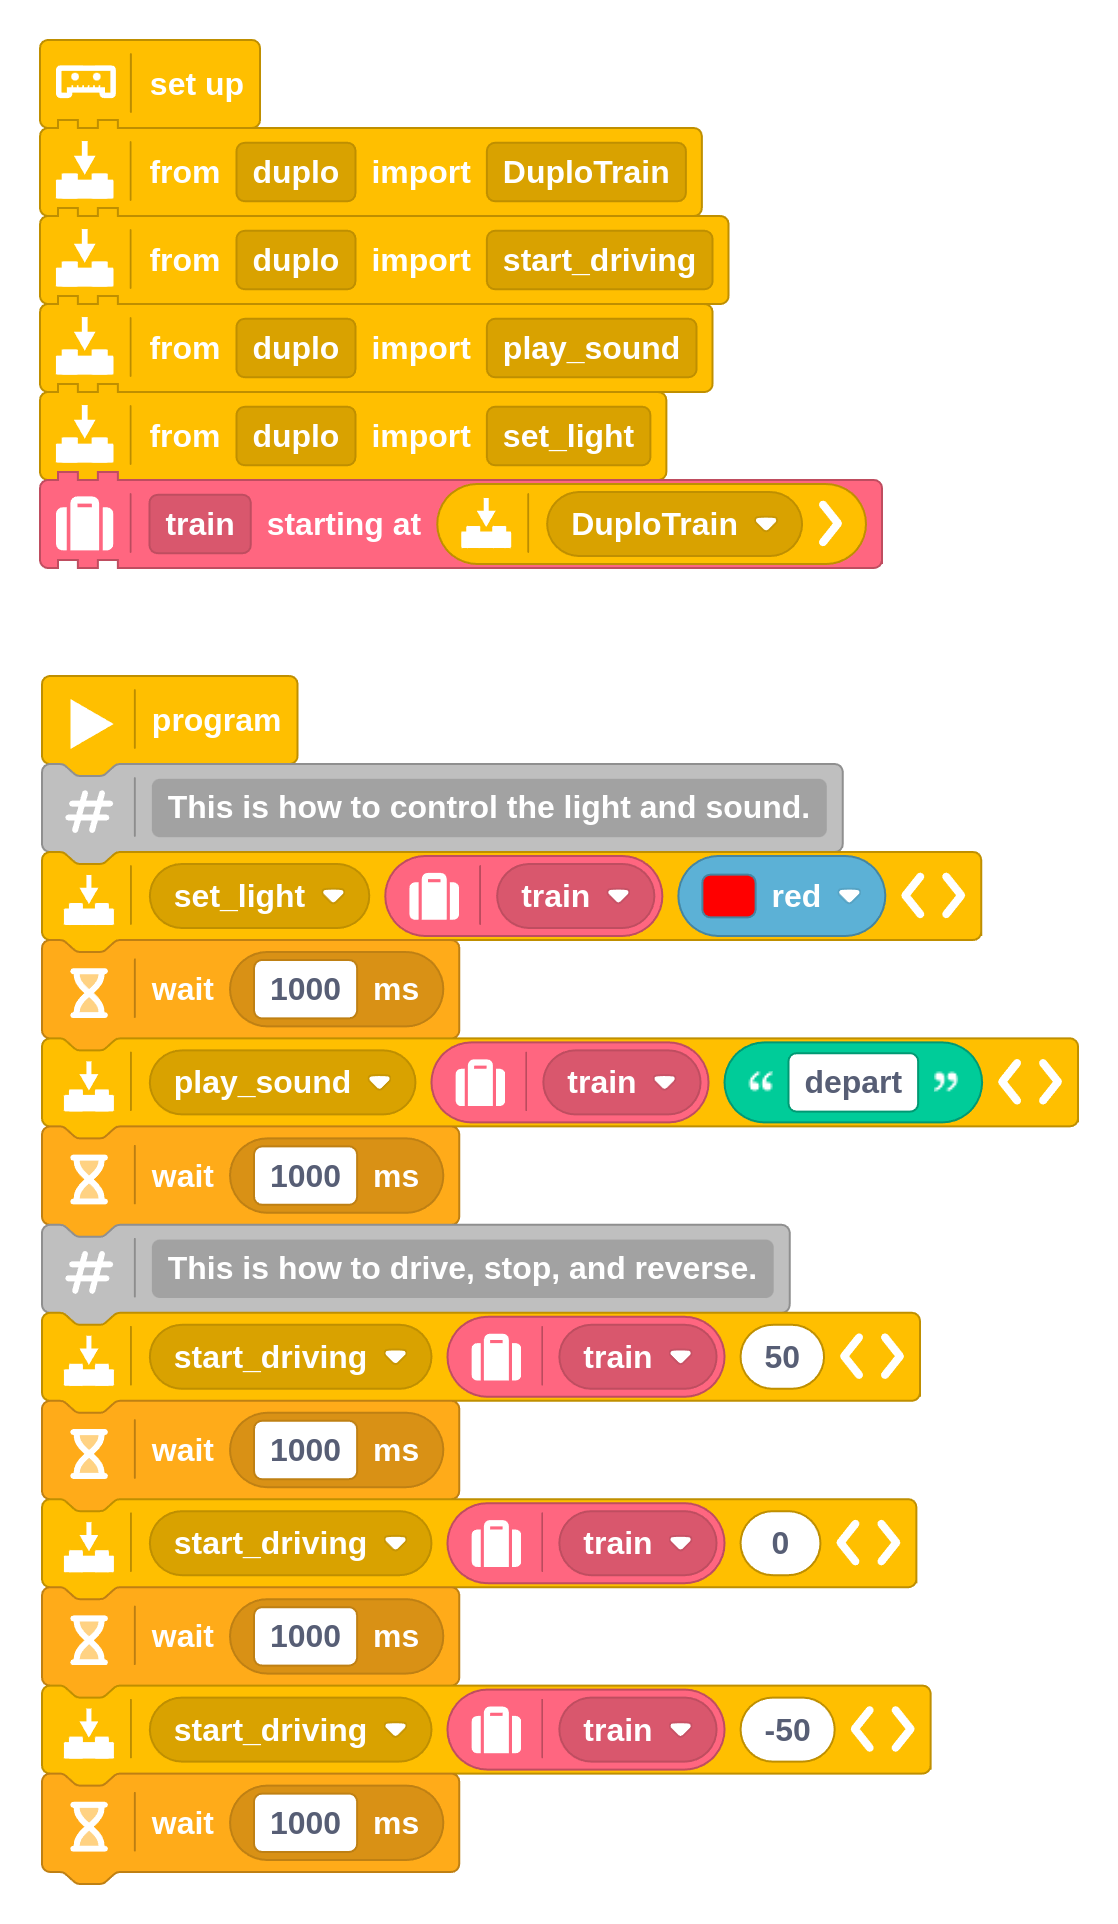
This basic program shows how to control the train motor, sound, and light.
You can use these functions:
start_driving: Start the train motor at the given speed (-100% to 100%). Positive
values go forward, and negative values go backward, and 0 stops the motor. Under
25%, it doesn’t move at all.
play_sound: Play a sound on the train. You can pick one of these names:
depart, brake, water, horn, or steam. The depart sound is kind of
fun and it isn’t normally available with the action bricks!
set_light: Set the light color of the train. You can choose between
magenta, blue, green, yellow, orange, and red. Choose none to
turn the light off.
If you’re not sure how to set up each of these blocks individually, you can
start from the example given above and just copy, paste, and modify the blocks
as needed.
Making the connection
Your LEGO hub will search for the train automatically when you start your
program. Make sure the train is on.
The train is only connectable while the light is blinking white. It does this
for about 30 seconds after you turn it on with the green button. If the light
isn’t blinking, just turn it off and on again.
Running the Pybricks program
This project uses Pybricks on your LEGO hub. Pybricks makes your creations
come alive and helps you unlock the full potential of your LEGO Technic,
City, MINDSTORMS, BOOST, or Spike sets.
If you haven’t already, install Pybricks on your hub as shown below, or check
out our getting started guide for more details. You can go
back to the LEGO firmware and apps at any time.
Tools
Install
Now import the program you downloaded earlier, as
shown below. Click to connect your hub and ▶ to
start!
files
import
open
connect
run
You can run imported block programs even if you’re not signed up. This is a
great way to try out Pybricks and see how it works.
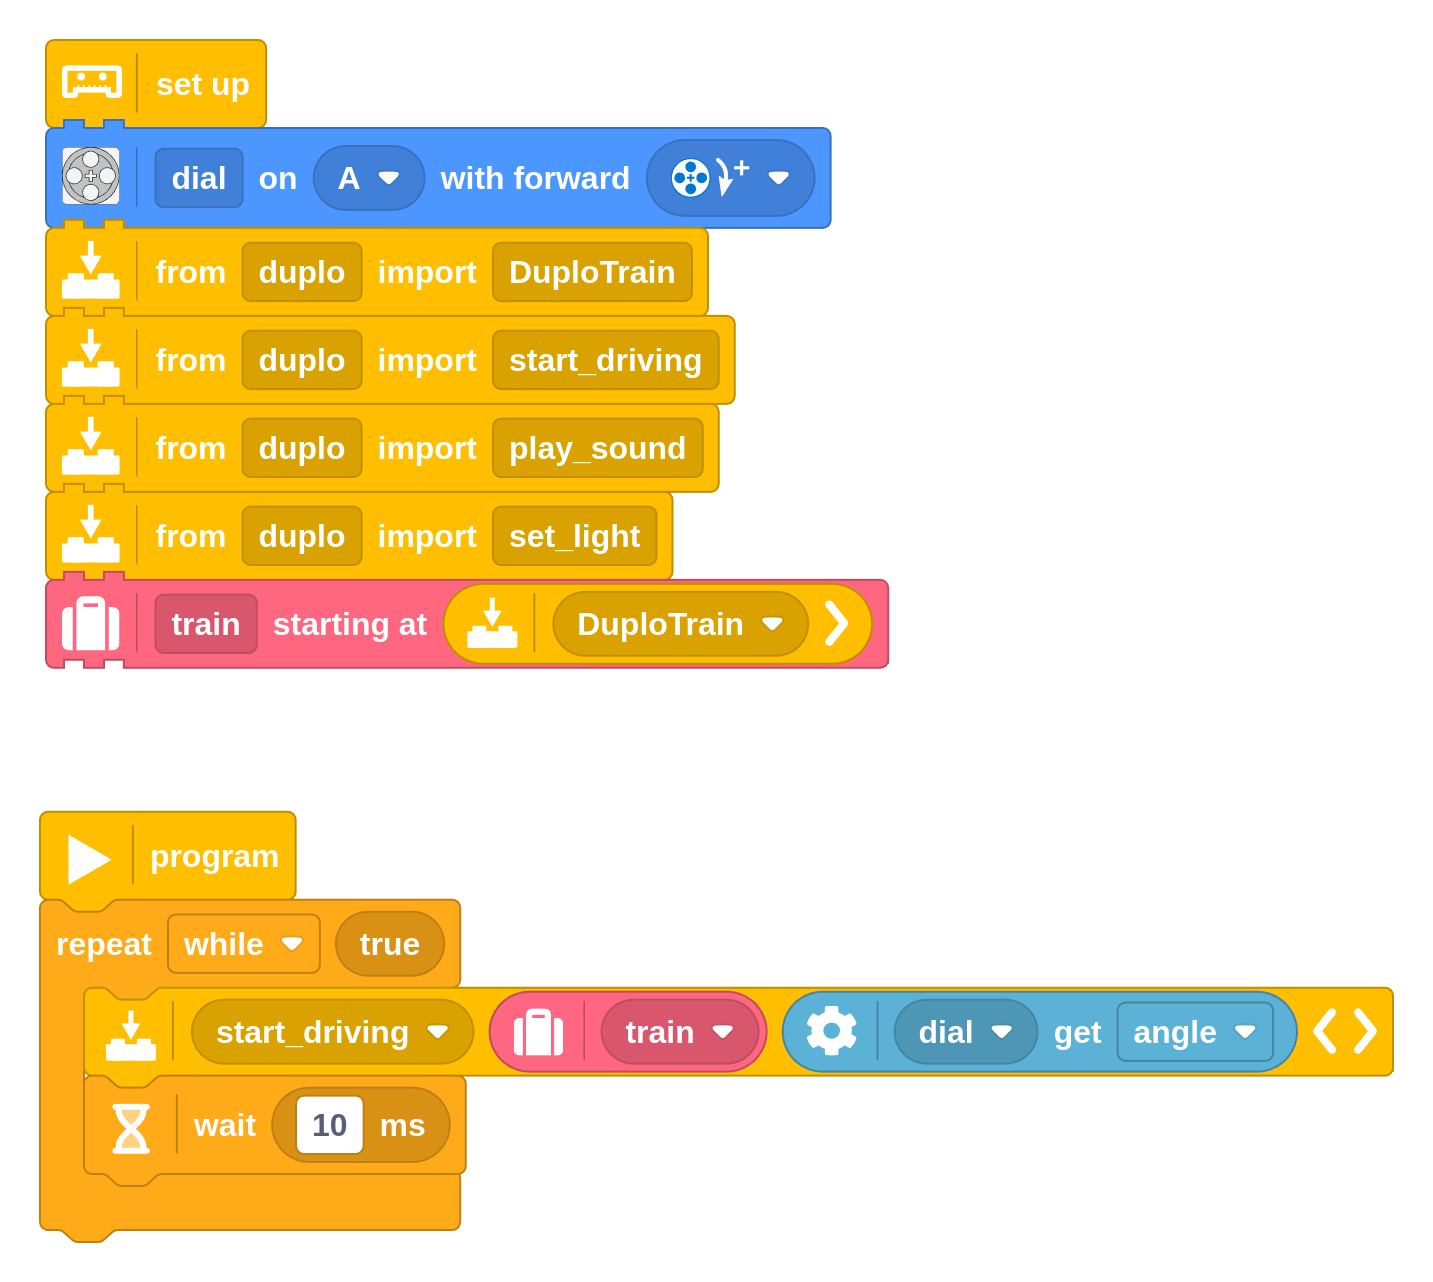
Making a speed control dial
With the basics out of the way, let’s build a simple controller for the train.
You can
use any motor with rotation sensors
for this example.
Controlling the train speed with the motor as a dial.
This program measures the angle of the motor and uses it to control the train
speed.
So if you push the motor to +100 degrees (just over a quarter turn), the
train will go full speed forward. If you push it to -100 degrees, the train will
go full speed backward. And if you put the motor back to the middle, the train
will stop.
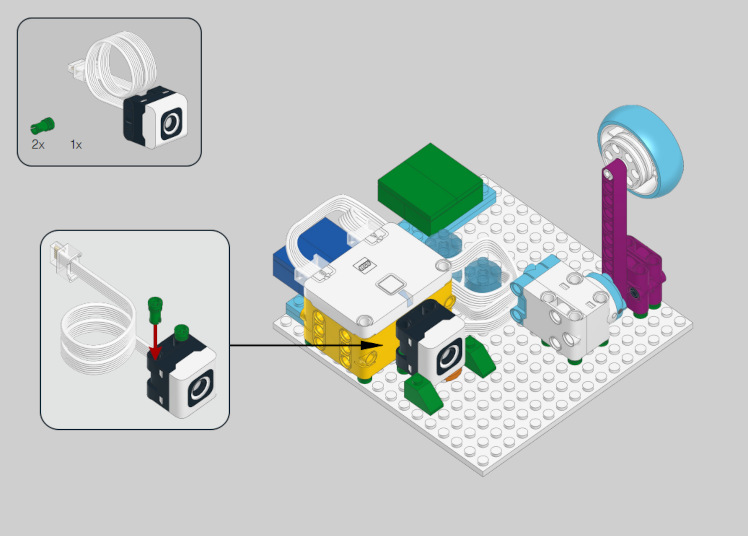
Adding lights and sounds to the dashboard
Let’s take this a step further and add some interactive lights and sounds to
the controller. For the kids, this will make it feel like a real train
dashboard!
Building instructions
This example uses the LEGO Education Spike Essential (45345)
set for inspiration,
but you should be able to do this project with any LEGO set with similar motors
and sensors.
Click the image below to download the instructions.
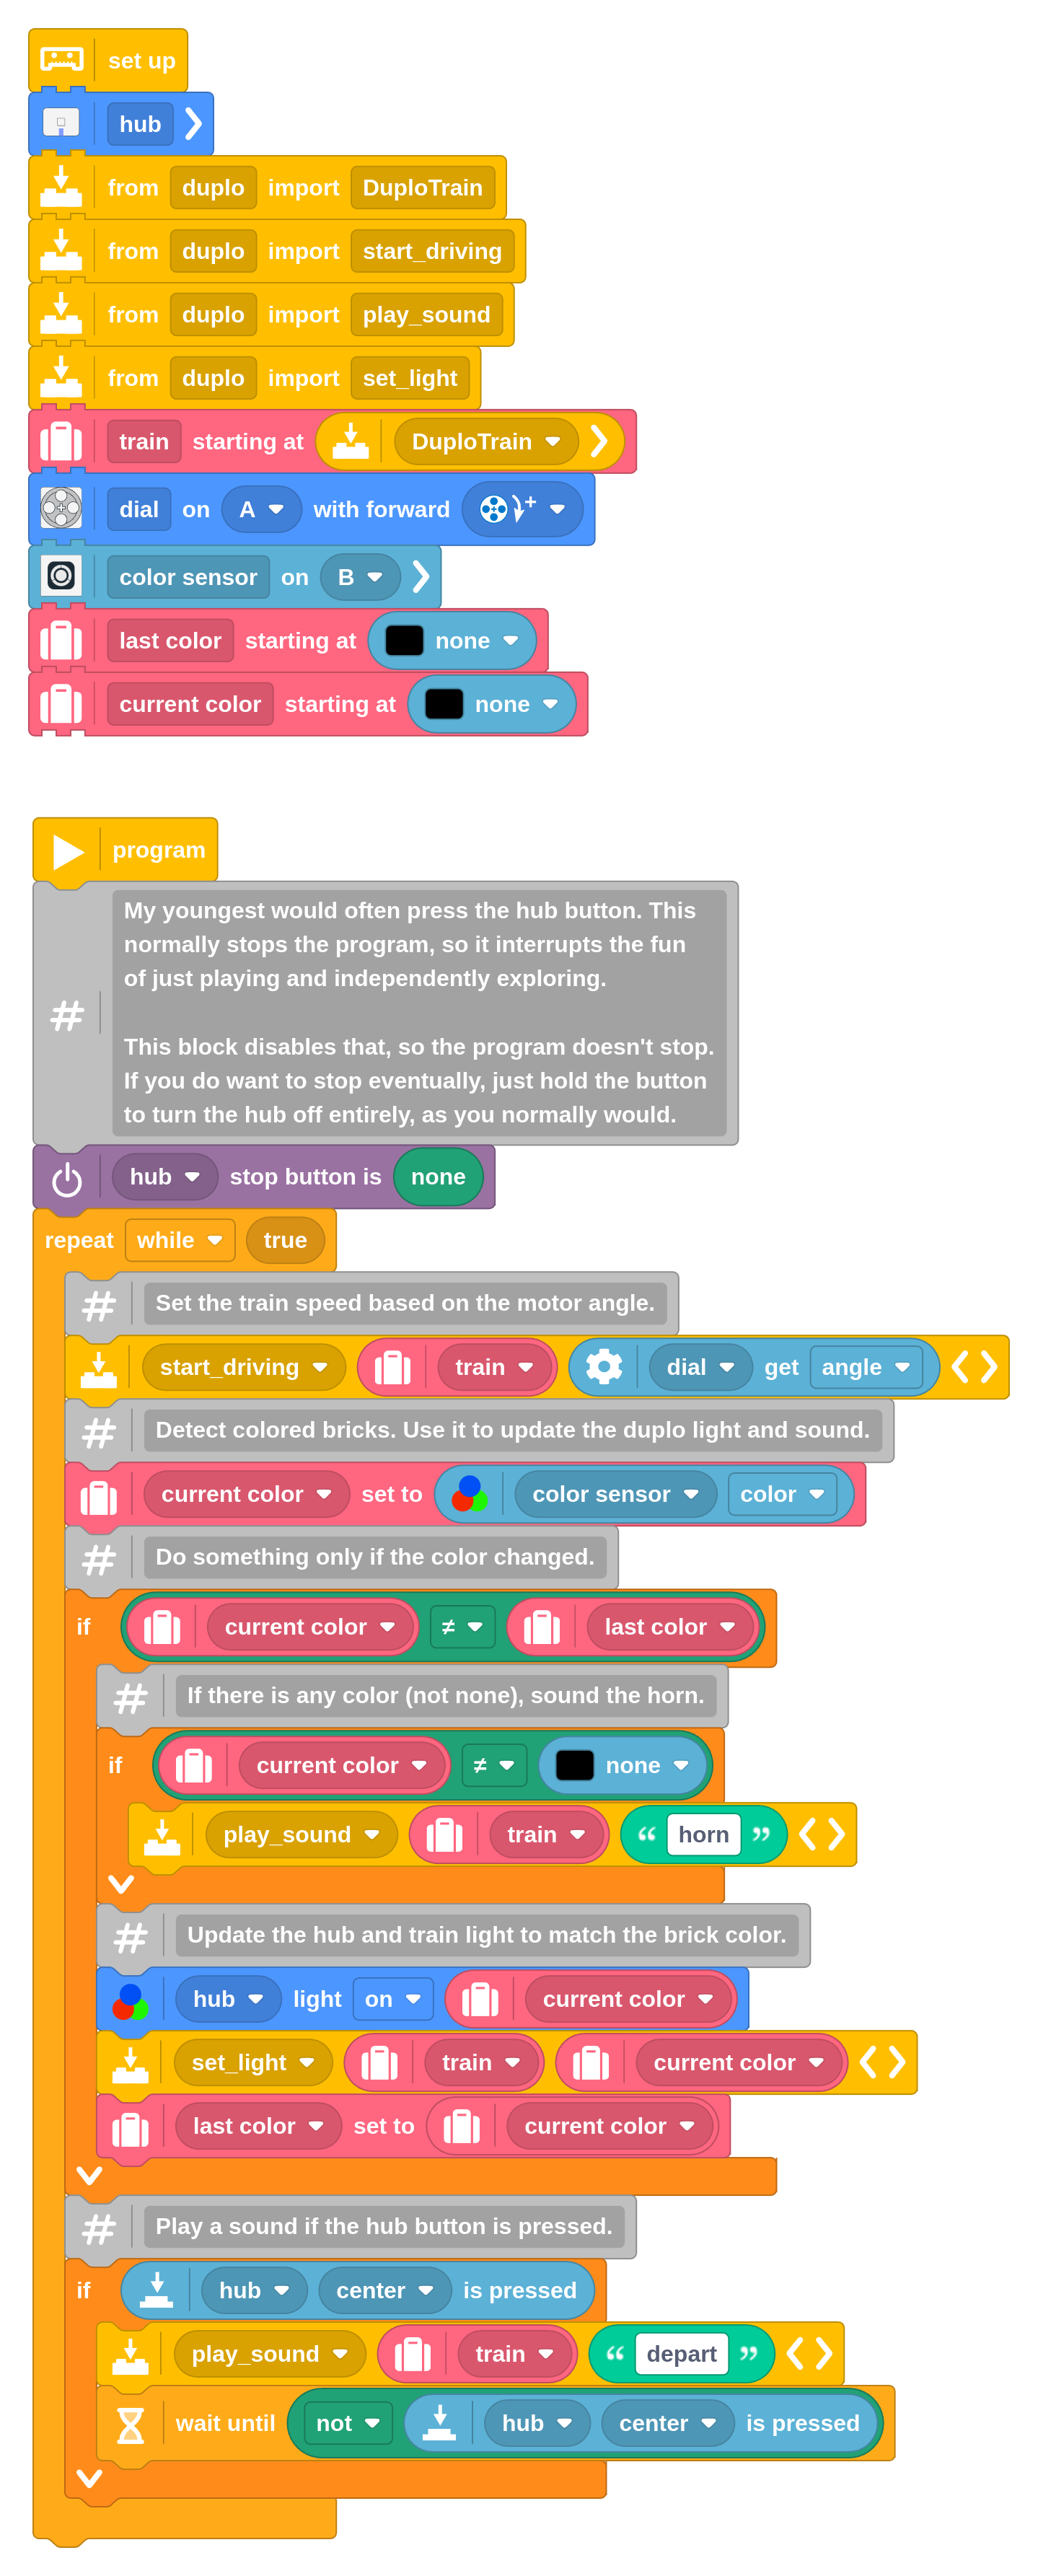
The full program
As in the video, the program implements the following actions:
The train motor is controlled by the motor angle as in the previous example.
The train light color is controlled by what the color sensor sees. You can
put a colored duplo brick in front of it, for example.
The hub light does the same. This made it easier to understand for the kids
since at this point they are looking at the controller instead of the train.
It plays a choo-choo sound when a new colored brick is detected.
It plays the departure sound when the hub button is pressed.
If you have a different LEGO hub, just replace the hub setup block at the top
with the one that matches yours.
A more elaborate example with lights, sounds, and speed control.
Using Python instead
If you prefer to use Python instead of block coding, you can! Using that same
imported module discussed above, you can write your main program in Python as
well. Here’s an example to get you started.
frompybricks.parametersimportColorfrompybricks.toolsimportwaitfromduploimportDuploTrain# Initialize and connect to the train.
train=DuploTrain()# This is how to control the light.
train.set_light(Color.RED)wait(1000)# This is how to control the sound.
train.play_sound('depart')wait(1000)# This is how to drive, stop, and reverse.
train.start_driving(50)wait(1000)train.stop_driving()wait(1000)train.start_driving(-50)wait(1000)
Digging deeper
If you take a closer look at the extra module,
you’ll see that it is based on
the LEGO Wireless 3.0 protocol,
or LWP3 for short. This is the same protocol used to connect with most LEGO hubs that run
the official firmware.
This lets you connect with hubs that aren’t directly
supported by Pybricks. The Duplo train is a good example, but you could do
something similar with the Mario hubs, for example.
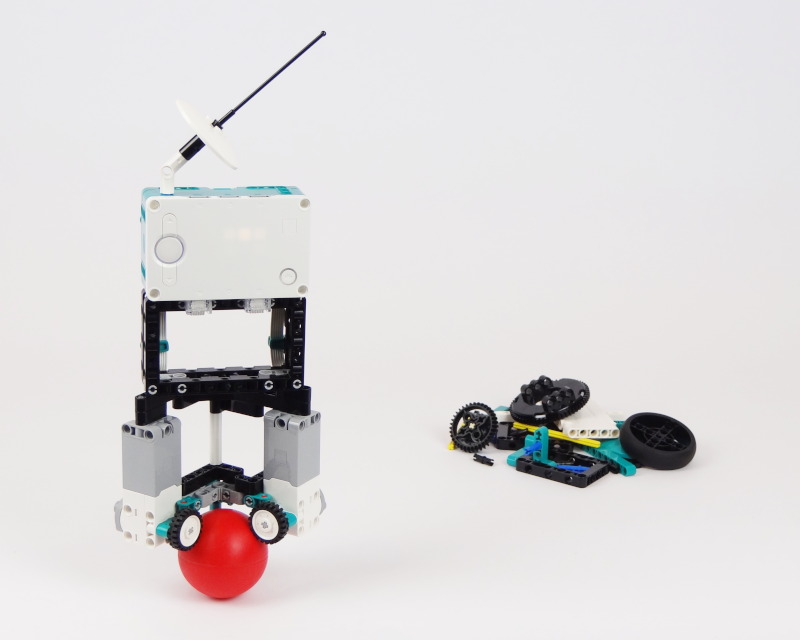
]]>Laurens ValkBuilding a LEGO MINDSTORMS Robot that balances on a ball2024-05-28T00:00:00+00:002024-05-28T00:00:00+00:00https://pybricks.com/project/lego-mindstorms-ball-balancerI’ve always been fascinated by robots that can balance on a ball.
It’s one of
those builds that looks like magic, but it’s ultimately just a fast feedback
loop. The robot constantly measures the tilt of the robot using the gyro
sensor and adjusts the motors to keep the robot upright.
In this article, we’ll show you how you can build and program your own
balancing robot using the LEGO MINDSTORMS Robot Inventor set.
You’ll use
Pybricks to code it, which is much faster and stable than the standard
programming environment, which is crucial for balancing robots.
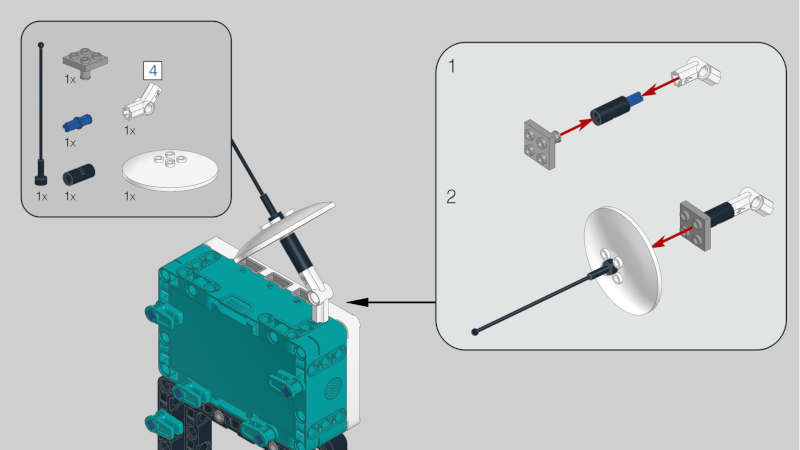
Building the robot
When this set was initially launched, I was super excited to see that it
included the Duplo ball and some small wheels. I immediately thought about
building a balancing robot with it. After many iterations, it worked!
You can build this robot with the elements of the LEGO MINDSTORMS Robot
Inventor set (51515). Click the image below to download the instructions. Just
follow the steps and you’ll have your robot ready in no time.
You can also build this robot with the SPIKE Prime set. While the hub works
the same, it comes with different building elements so you might want to check
out these instructions instead.
The balancing program
The program below balances the robot along two axes at the same time. One motor
is used to control the x axis using the gyro sensor value of the x axis. The
other motor is used to control the y axis.
The feedback to each motor is a weighted sum of all the signals it needs to
keep at zero. This includes the gyro angle, gyro speed, motor angle, and motor
speed. The weights are tuned to make the robot stable.
The ball balancing program
When you turn the hub on, leave it on the desk or the floor for a few seconds.
This gives the gyro sensor a chance to calibrate. Then put the robot on top
of the ball and let it stand upright between your hands. Start the program and
carefully let go.
Naturally, you can keep your hands close to prevent it from falling flat, but
it is generally best to not try to help the robot forcefully. It needs to find
its own path!
You can see how this works in the video above.
Running the Pybricks program
This project uses Pybricks on your LEGO hub. Pybricks makes your creations
come alive and helps you unlock the full potential of your LEGO Technic,
City, MINDSTORMS, BOOST, or Spike sets.
If you haven’t already, install Pybricks on your hub as shown below, or check
out our getting started guide for more details. You can go
back to the LEGO firmware and apps at any time.
Tools
Install
Now import the program you downloaded earlier, as
shown below. Click to connect your hub and ▶ to
start!
files
import
open
connect
run
You can run imported block programs even if you’re not signed up. This is a
great way to try out Pybricks and see how it works.
Running it as a Python program
You can also run this project as a Python (MicroPython) program. The following
code was generated from the block program above.
To run it, create a new empty Python program in Pybricks and copy the code into
it.
frompybricks.hubsimportInventorHubfrompybricks.parametersimportAxis,Direction,Portfrompybricks.pupdevicesimportMotorfrompybricks.toolsimportvector,waitfromumathimportcopysign# Set up all devices.
hub=InventorHub(top_side=vector(1,1,0),front_side=vector(-1,1,0))motor_x=Motor(Port.B,Direction.COUNTERCLOCKWISE)motor_y=Motor(Port.F,Direction.COUNTERCLOCKWISE)# Initialize variables.
start_angle_x=hub.imu.rotation(Axis.X)start_angle_y=hub.imu.rotation(Axis.Y)defbalance(motor,axis,start_angle,duty):# The feedback to the motor is a weighted sum of the gyro angle,
# gyro angular velocity, motor angle, and motor speed.
duty=88*(hub.imu.rotation(axis)-start_angle)+hub.imu.angular_velocity(axis)*7/20+motor.angle()*18/25+motor.speed(window=250)*19/100# The feedback value is applied to the motor. We also add 10% extra
# to account for friction. The result is scaled by the battery level so it
# behaves the same over time.
motor.dc(7400*(duty+copysign(10,duty))/hub.battery.voltage())# The main program starts here.
# Check that the hub gyro is ready for use.
ifnothub.imu.ready():hub.speaker.beep(500,100)raiseSystemExitmotor_x.reset_angle(0)motor_y.reset_angle(0)# Keep balancing forever.
whileTrue:balance(motor_x,vector(1,0,0),start_angle_x,0)balance(motor_y,vector(0,1,0),start_angle_y,0)wait(10)
Python representation of the block program.
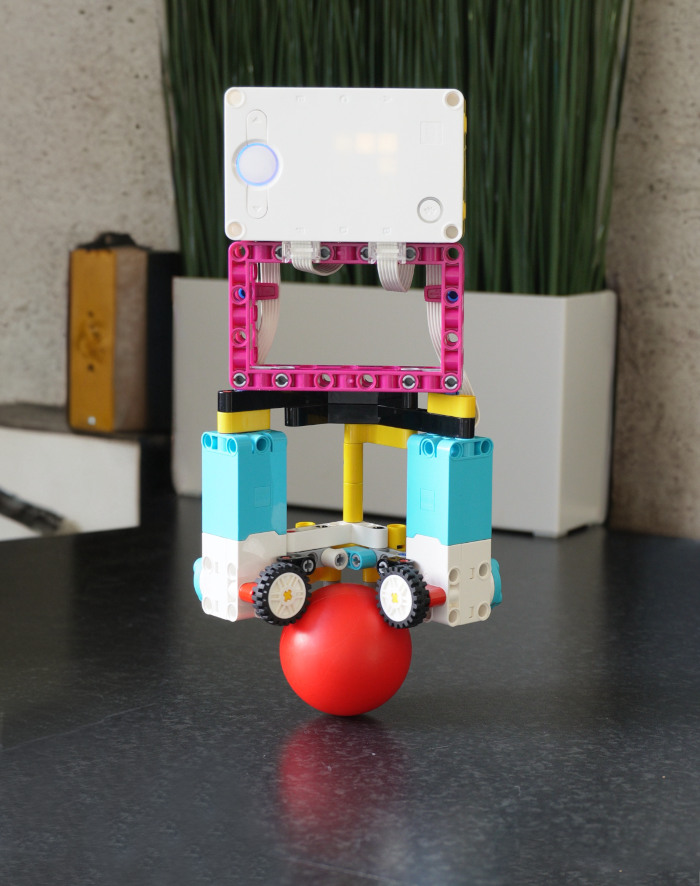
]]>Laurens ValkBuilding a LEGO SPIKE Prime Robot that balances on a ball2024-05-28T00:00:00+00:002024-05-28T00:00:00+00:00https://pybricks.com/project/lego-spike-ball-balancerJust like Technic Hub, the SPIKE Prime Hub has a really accurate gyro sensor.
What better way to show what it can do than to build a balancing robot?
In this article, we’ll show you how you can build and program your own
balancing robot using LEGO SPIKE Prime.
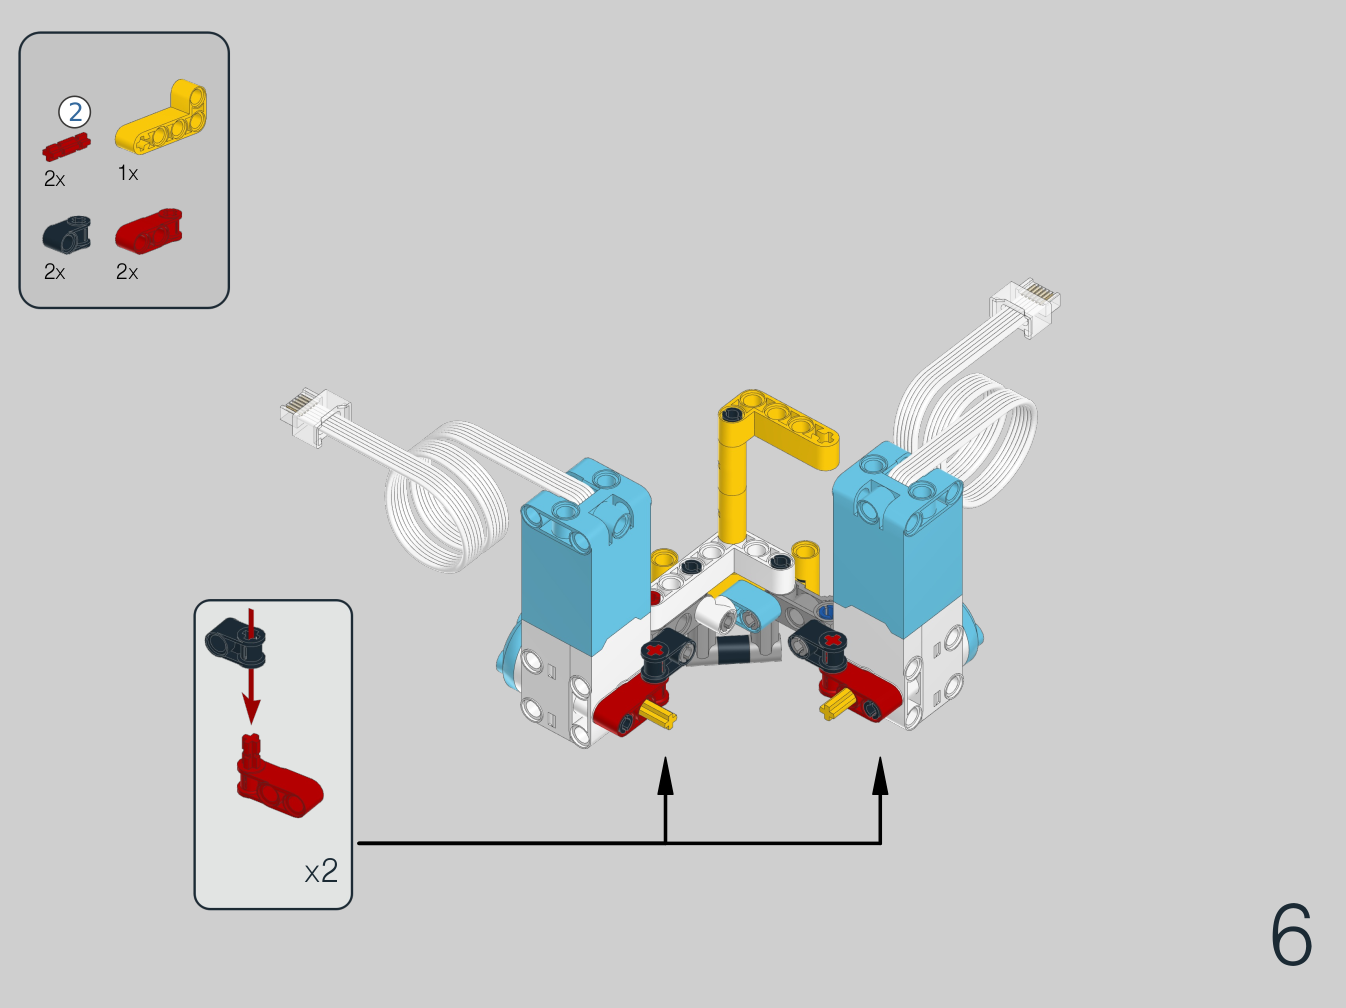
Building the robot
You can build it with the SPIKE Prime core and expansions sets. It doesn’t use
that many pieces, so you may be able to build it from spare pieces even if you
don’t have the expansion set. The ball comes in various LEGO and Duplo
sets and is available on
Bricklink for less than $1.
You can also build this robot with the MINDSTORMS Robot Inventor set. While the hub works
the same, it comes with different building elements. Check
out these instructions instead.
Click the image below to download the instructions. Just
follow the steps and you’ll have your robot ready in no time.
The balancing program
The program below balances the robot along two axes at the same time. One motor
is used to control the x axis using the gyro sensor value of the x axis. The
other motor is used to control the y axis.
The feedback to each motor is a weighted sum of all the signals it needs to
keep at zero. This includes the gyro angle, gyro speed, motor angle, and motor
speed. The weights are tuned to make the robot stable.
The ball balancing program
When you turn the hub on, leave it on the desk or the floor for a few seconds.
This gives the gyro sensor a chance to calibrate. Then put the robot on top
of the ball and let it stand upright between your hands. Start the program and
carefully let go.
Naturally, you can keep your hands close to prevent it from falling flat, but
it is generally best to not try to help the robot forcefully. It needs to find
its own path!
You can see how this works in the video below.
Running the Pybricks program
This project uses Pybricks on your LEGO hub. Pybricks makes your creations
come alive and helps you unlock the full potential of your LEGO Technic,
City, MINDSTORMS, BOOST, or Spike sets.
If you haven’t already, install Pybricks on your hub as shown below, or check
out our getting started guide for more details. You can go
back to the LEGO firmware and apps at any time.
Tools
Install
Now import the program you downloaded earlier, as
shown below. Click to connect your hub and ▶ to
start!
files
import
open
connect
run
You can run imported block programs even if you’re not signed up. This is a
great way to try out Pybricks and see how it works.
Running it as a Python program
You can also run this project as a Python (MicroPython) program. The following
code was generated from the block program above.
To run it, create a new empty Python program in Pybricks and copy the code into
it.
frompybricks.hubsimportInventorHubfrompybricks.parametersimportAxis,Direction,Portfrompybricks.pupdevicesimportMotorfrompybricks.toolsimportvector,waitfromumathimportcopysign# Set up all devices.
hub=InventorHub(top_side=vector(1,1,0),front_side=vector(-1,1,0))motor_x=Motor(Port.B,Direction.COUNTERCLOCKWISE)motor_y=Motor(Port.F,Direction.COUNTERCLOCKWISE)# Initialize variables.
start_angle_x=hub.imu.rotation(Axis.X)start_angle_y=hub.imu.rotation(Axis.Y)defbalance(motor,axis,start_angle,duty):# The feedback to the motor is a weighted sum of the gyro angle,
# gyro angular velocity, motor angle, and motor speed.
duty=88*(hub.imu.rotation(axis)-start_angle)+hub.imu.angular_velocity(axis)*7/20+motor.angle()*18/25+motor.speed(window=250)*19/100# The feedback value is applied to the motor. We also add 10% extra
# to account for friction. The result is scaled by the battery level so it
# behaves the same over time.
motor.dc(7400*(duty+copysign(10,duty))/hub.battery.voltage())# The main program starts here.
# Check that the hub gyro is ready for use.
ifnothub.imu.ready():hub.speaker.beep(500,100)raiseSystemExitmotor_x.reset_angle(0)motor_y.reset_angle(0)# Keep balancing forever.
whileTrue:balance(motor_x,vector(1,0,0),start_angle_x,0)balance(motor_y,vector(0,1,0),start_angle_y,0)wait(10)
Python representation of the block program.
]]>Laurens ValkHow to download multiple Pybricks programs with your own menu2024-05-24T00:00:00+00:002024-05-24T00:00:00+00:00https://pybricks.com/project/spike-hub-menuNormally, only one program is saved on the hub. This usually makes it easy to
find and start your latest project. And it’s especially practical on hubs
without a display.
But the SPIKE Prime Hub and the MINDSTORMS Robot Inventor hub have plenty of
space for multiple programs. Downloading multiple programs is useful in
competitions like FLL or WRO, where you might want to break down your programs into
several missions.
This method differs from the conventional program “slots”, but it’s easy to
set up and you have much more flexibility in how your mission programs work.
This article shows how you can download multiple programs, and add a simple
menu that helps you start your selected program using the buttons on the hub.
You can use numbers in your menu, but also letters and symbols. This is often
way easier to remember on competition day!
Multiple mission programs
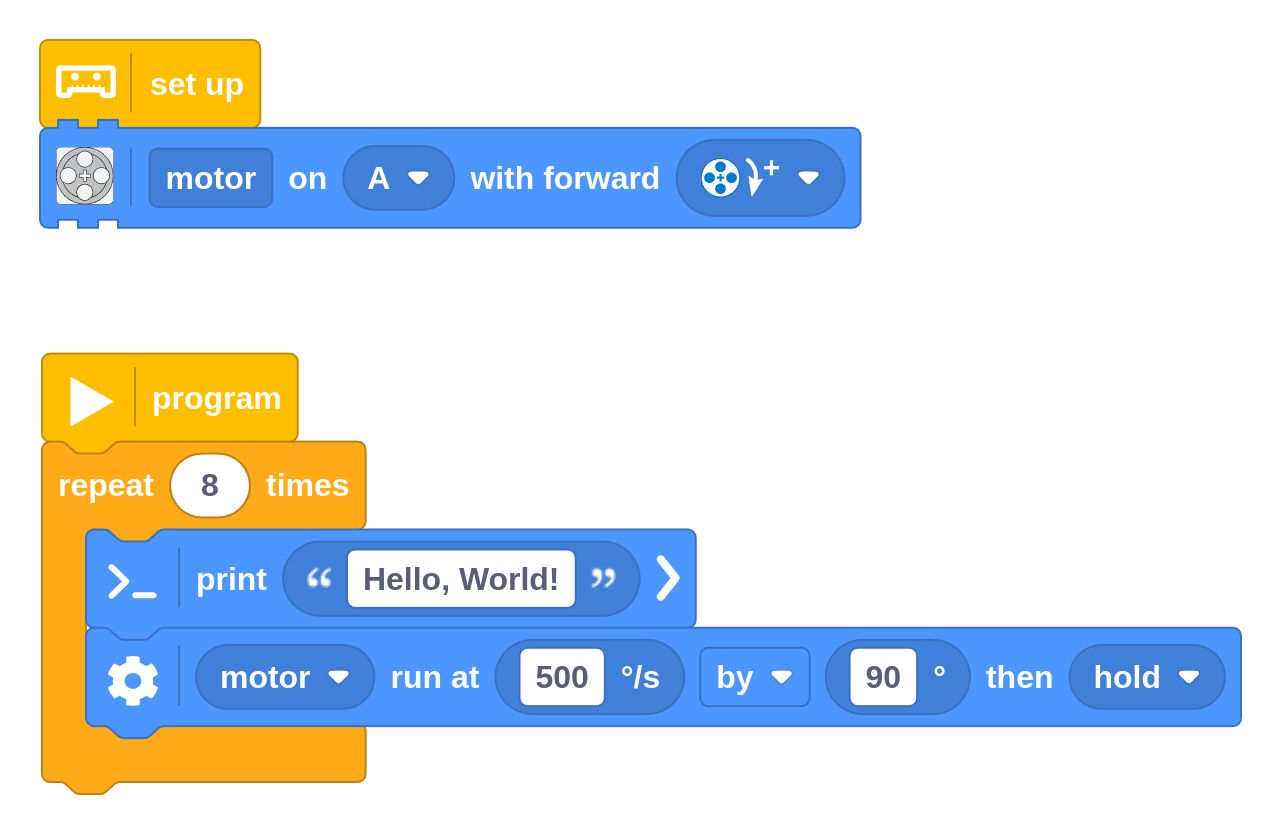
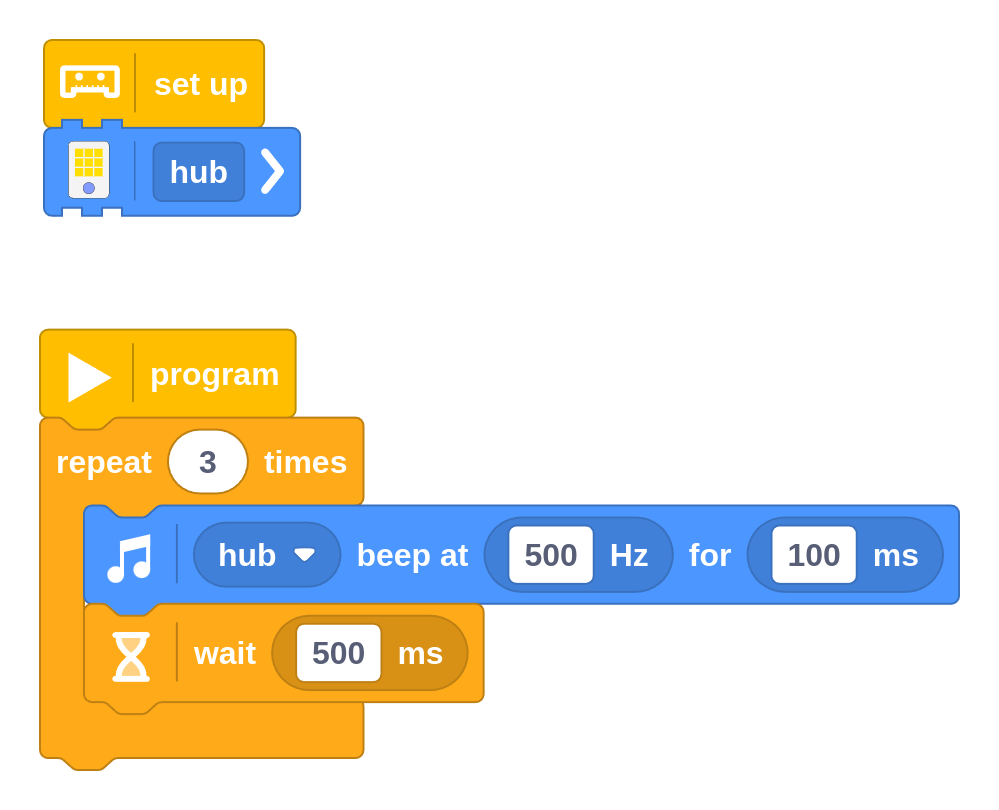
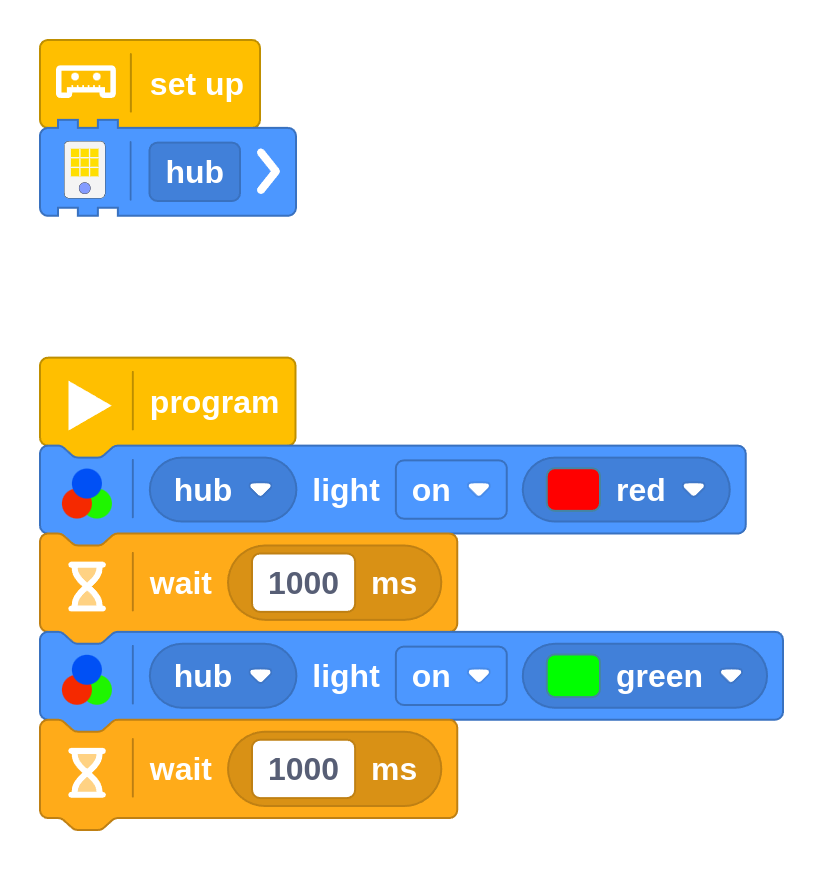
For the purpose of this article, let’s assume we have three “mission” programs.
These programs are very simple, but you can do this with programs of any size.
If you prefer to use Python for your missions, that’s fine too.
The 'hello_world' program
The 'sound' program
The 'light' program
Adding a menu program
The next step is to add a “main program” that acts as your own menu.
In this example, we’ll make a menu with the letters:
H to start the hello_world program
S to start the sound program
L to start the light program
To run it, create a new Python program. You can pick any name, such as menu
and paste the following code into it.
frompybricks.toolsimporthub_menu# Make a menu to choose a letter. You can also use numbers.
selected=hub_menu("H","S","L")# Based on the selection, run a program.
ifselected=="H":importhello_worldelifselected=="S":importsoundelifselected=="L":importlight
When you run it, you’ll see the letter H on the hub. You can toggle through
the other letters with the left and right buttons. Press the center button to
start one of them.
You can start this main menu again with the start button.
Although this main menu was made using Python, you’ll find that it is very easy
to adapt. Just change the letters or program names to match your mission. You
can also add extra programs or remove a few.
If you’d rather use a dedicated block for this menu instead of Python, feel
free to let us know on the discussion
forum.
How did it work?
The Python program you just ran has two main parts:
The hub_menu function combines the display and the buttons to let you pick
a symbol.
One of the import statements will run the respective mission program.
Whenever a Pybricks program contains an import statement, the respective file
is downloaded to the hub along with your main program. So, by downloading your
menu program to the hub, it also downloaded the hello_world, sound and
light programs along with it.
You can still download and run each program separately during testing. Just
remember to download the menu program to the hub again afterwards!
Caveats
This extra section is only needed if you want to write more advanced menus. If
you’re happy with the menu technique above, just skip this section.
There is nothing inherently special about this “menu program”. It is a Python
program like any other. Import statements work just like they normally do. This
offers great flexibility, but it can result in some surprises if you’re new to
Python.
The approach used above works great for a basic menu, but you might want to
organize your code a bit differently in case you want to take this menu
technique even further.
The import statement will run a program only the first time, even if you run
the same import again in the same program. This is why programmers would
usually write the “mission” as a function (a task) instead. You could import
that function and call it from your menu program as many times as you like.
Multiple programs on other hubs
You can use this same technique of using import statements to combine
multiple programs on any hub. The other hubs don’t have a display and multiple
buttons, however, so you may need to get creative to determine the selected
program.
For example, you could make the hub cycle through a set of colors with the hub
button, and then choose a particular program by pressing the button a bit
longer. You can also select the import dynamically based on what’s plugged in,
as shown below.
Choose which program to run based on what is plugged in
As an alternative to selecting a program using a menu, you can use a similar
technique to automatically choose which program to run based on what is plugged
in. This is useful if you have a robot that can do different things based on
what sensors or motors are connected.
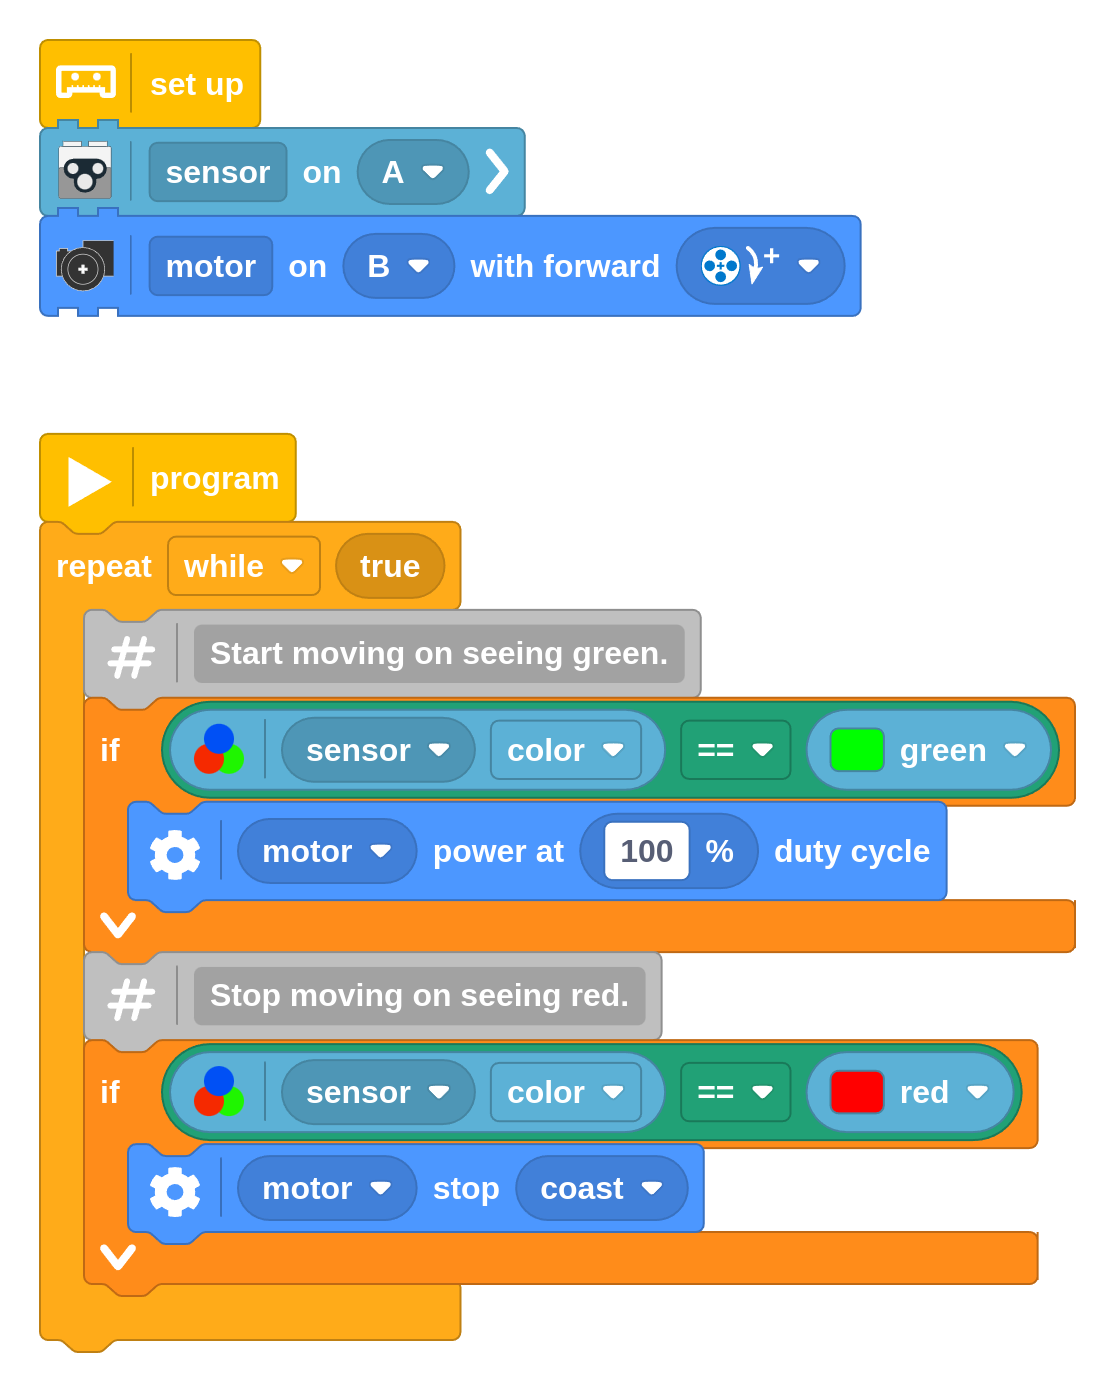
To illustrate this, let’s add another example program. This simple program
start a DC Motor if the Boost Color and Distance sensor sees green, and stops
it if it sees red.
The 'sensor_start' program
Now suppose we want to run that program if those devices are actually plugged
in, and otherwise run the hello_world program from before.
To do that, create a new Python program. You can pick any name, such as
choose_program and paste the following code into it.
This will try to run the sensor_start program. When the devices are not
plugged in, this raises OSError so it will run the hello_world program
instead.
You can adapt this to your own project, and even nest these checks to choose
between more than two programs.
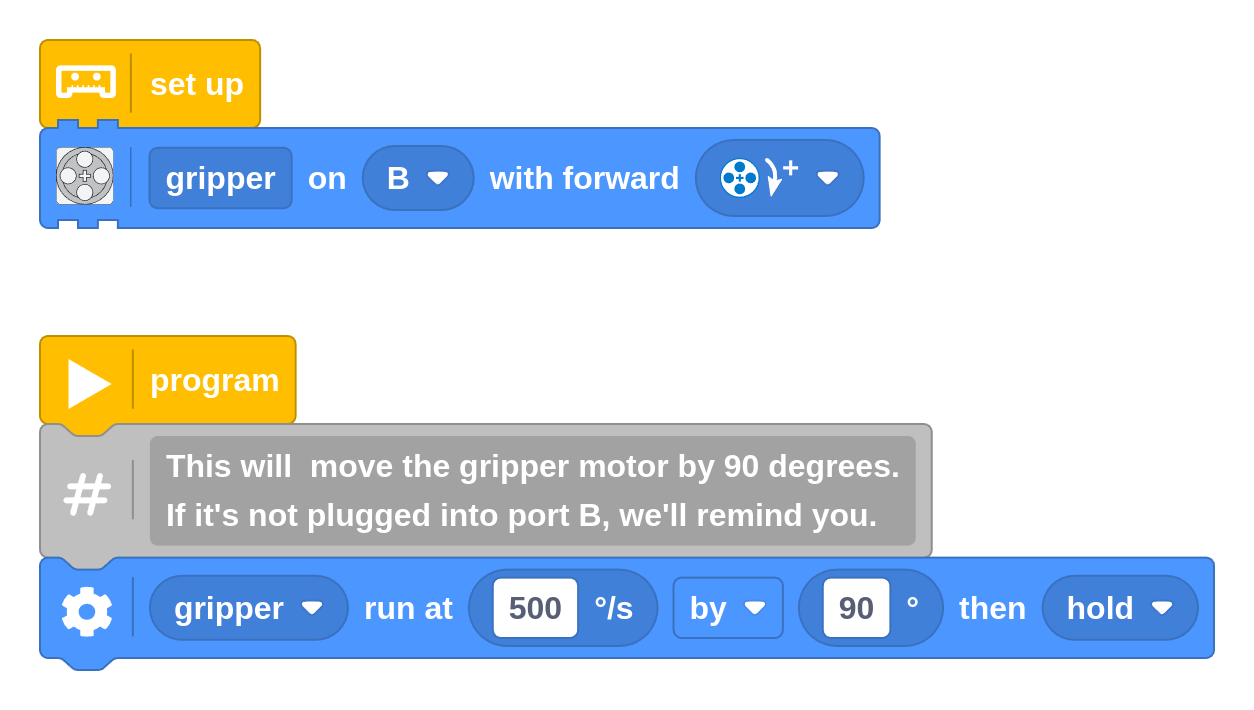
]]>Laurens ValkHow to disable motor checks in multipurpose Pybricks programs2024-05-23T00:00:00+00:002024-05-23T00:00:00+00:00https://pybricks.com/project/disable-motor-detectIf you forget to plug in a motor that you use in your program, you normally
see this tip to remind you, in the output window:
A sensor or motor is not connected to the specified port:
--> Check the cables to each motor and sensor.
--> Check the port settings in your script.
When you use a motor that is not plugged in, you'll see this message
in the output window.
When coding, errors are not bad but they are meant to help you catch
mistakes early on.
Why disable connection checks?
Most of the time, you’ll want to keep it that way. After all, now your robot
won’t drive off your desk with one motor still going while the other isn’t
plugged in (yep - we’ve all been there!)
But sometimes you just want to make a general purpose program that runs
whether or not something is plugged in. For example, you might want to make a
single program to test basic motion in all your creations.
In this article we’ll show you how to do this. You can do it with blocks or
with Python!
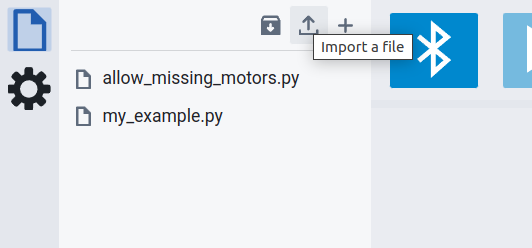
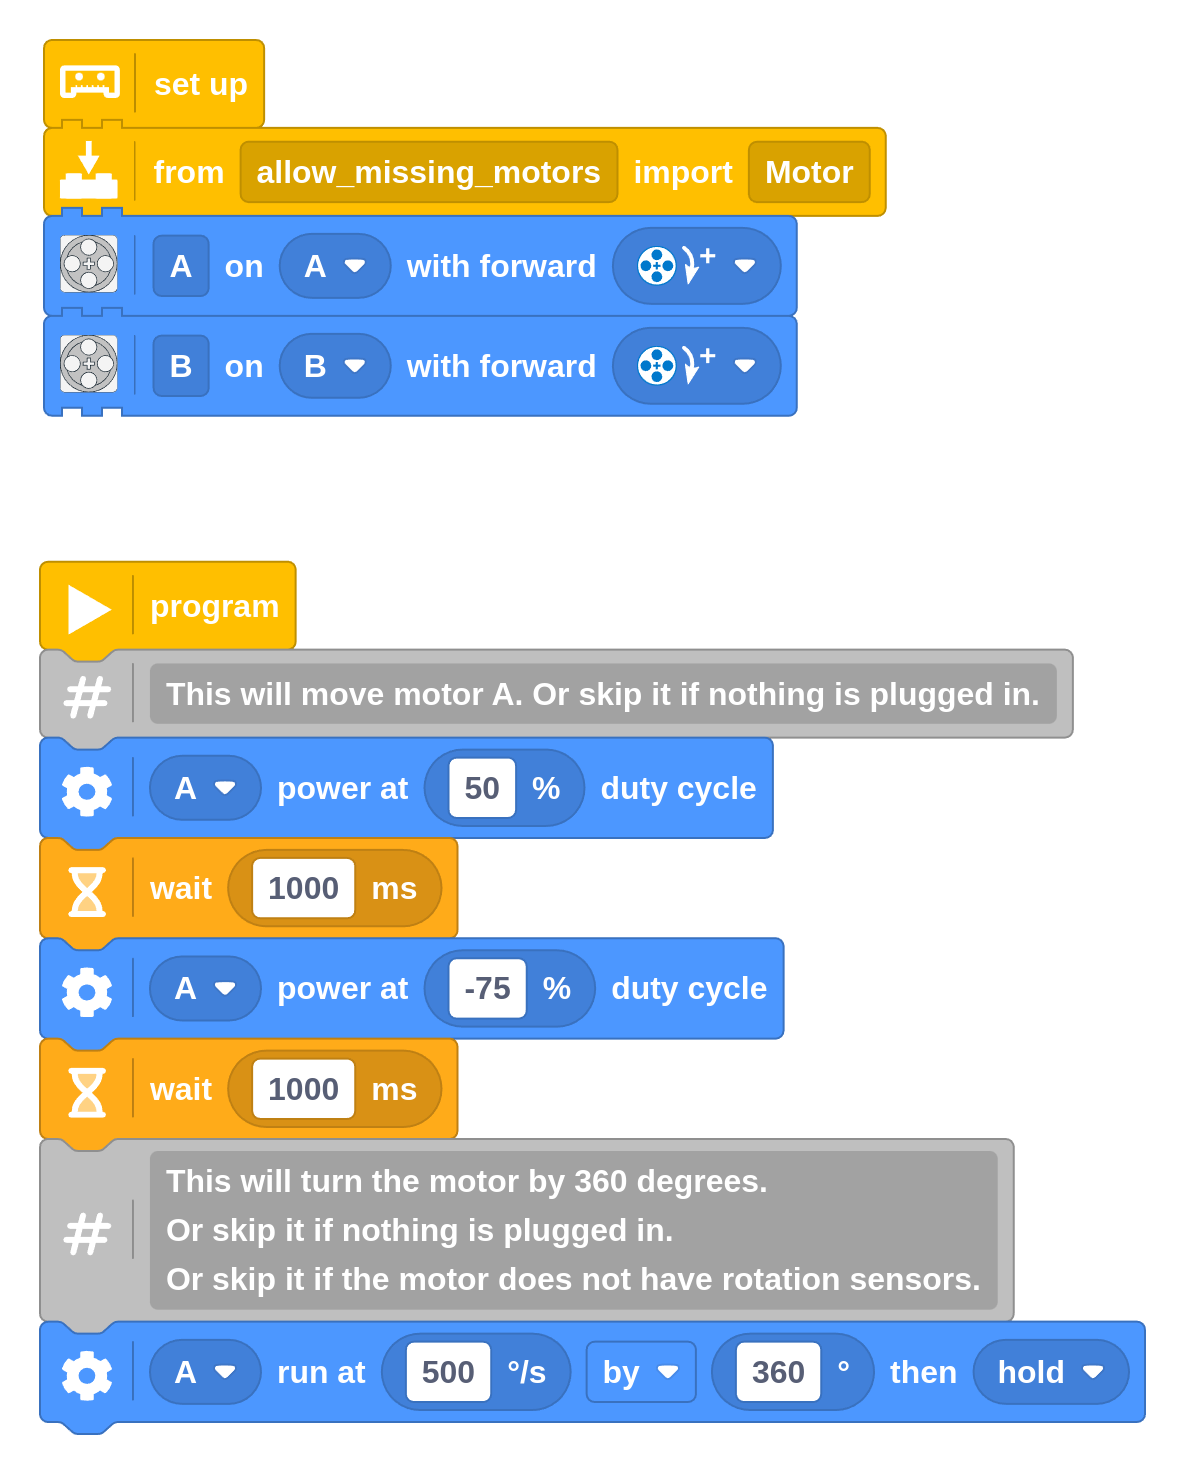
Adding an extra module
To make this work, you’ll import an extra module that lets you override
the usual checks. To do that,
download the file called allow_missing_motors.py
and import it into the Pybricks editor so it
shows up under your files:
Add the 'allow_missing_motors' module to your Pybricks files.
Because even block-based programs use Python under the hood, we can import this
module using the import block from the external tasks
category. This makes it skips the usual checks:
You can disable motor checks to make multipurpose motor projects.
There’s no need to understand all the details in the Python module to use it.
The main things to remember are:
You only need to add import block once as shown in the example above.
Only programs that use this import are affected. Every other program works
as usual and will always check the ports.
You can setup the motors at the top as usual. For lack of better names, you
can just call them the same as the respective port.
If a block you use is not supported by your motor, or nothing is plugged in,
your program will just ignore that block instead of raising an error.
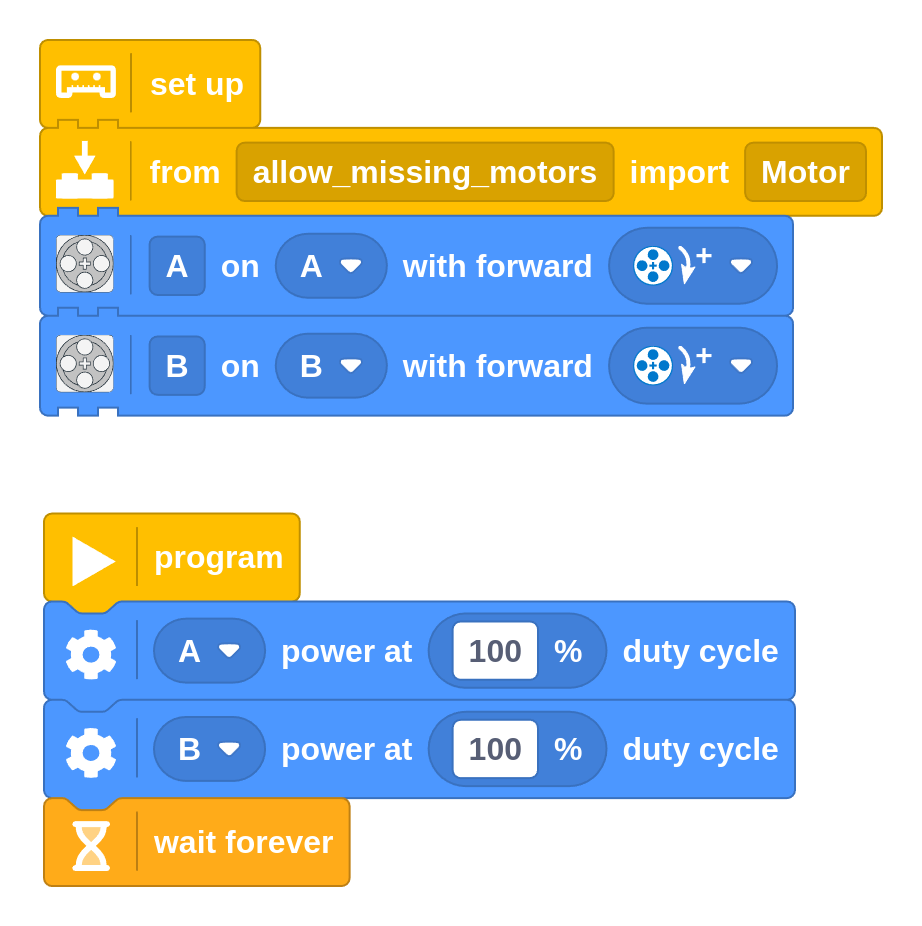
Making a simple battery box
Perhaps the simplest but useful example is to turn your hub into a simple
battery box, as shown below.
A simple 'battery box' program.
This just turns the motors on if they are connected. They keep running until
you stop the program using the button on the hub.
As a result, you can start the motors by clicking the button, and click it
again to turn them off. Just like a good old battery box!
Further exploration
With that extra module in place, you can easily get creative with your
multipurpose script, no matter what is plugged in. Can you create a program that…
… remote controls any of the ports?
… controls the motors with the hub button?
… changes the motor speed using the angle of motor?
Using Python for your main script
You can use this same technique if you use Python for your main program instead
of blocks. If you look closely at the block program above, you can probably
guess how this works. Just add the following line below your usual import
statements. That’s it!
fromallow_missing_motorsimportMotor
]]>Laurens ValkHow to create force feedback with the Xbox Controller2024-05-23T00:00:00+00:002024-05-23T00:00:00+00:00https://pybricks.com/project/xbox-rumbleWhen you connect the Xbox Controller to your LEGO Technic hub or LEGO Spike
hub, you can read the buttons and analog inputs, but also control the
builtin rumble actuators.
This lets you create haptic feedback, which can be great for immersive
remote control driving!
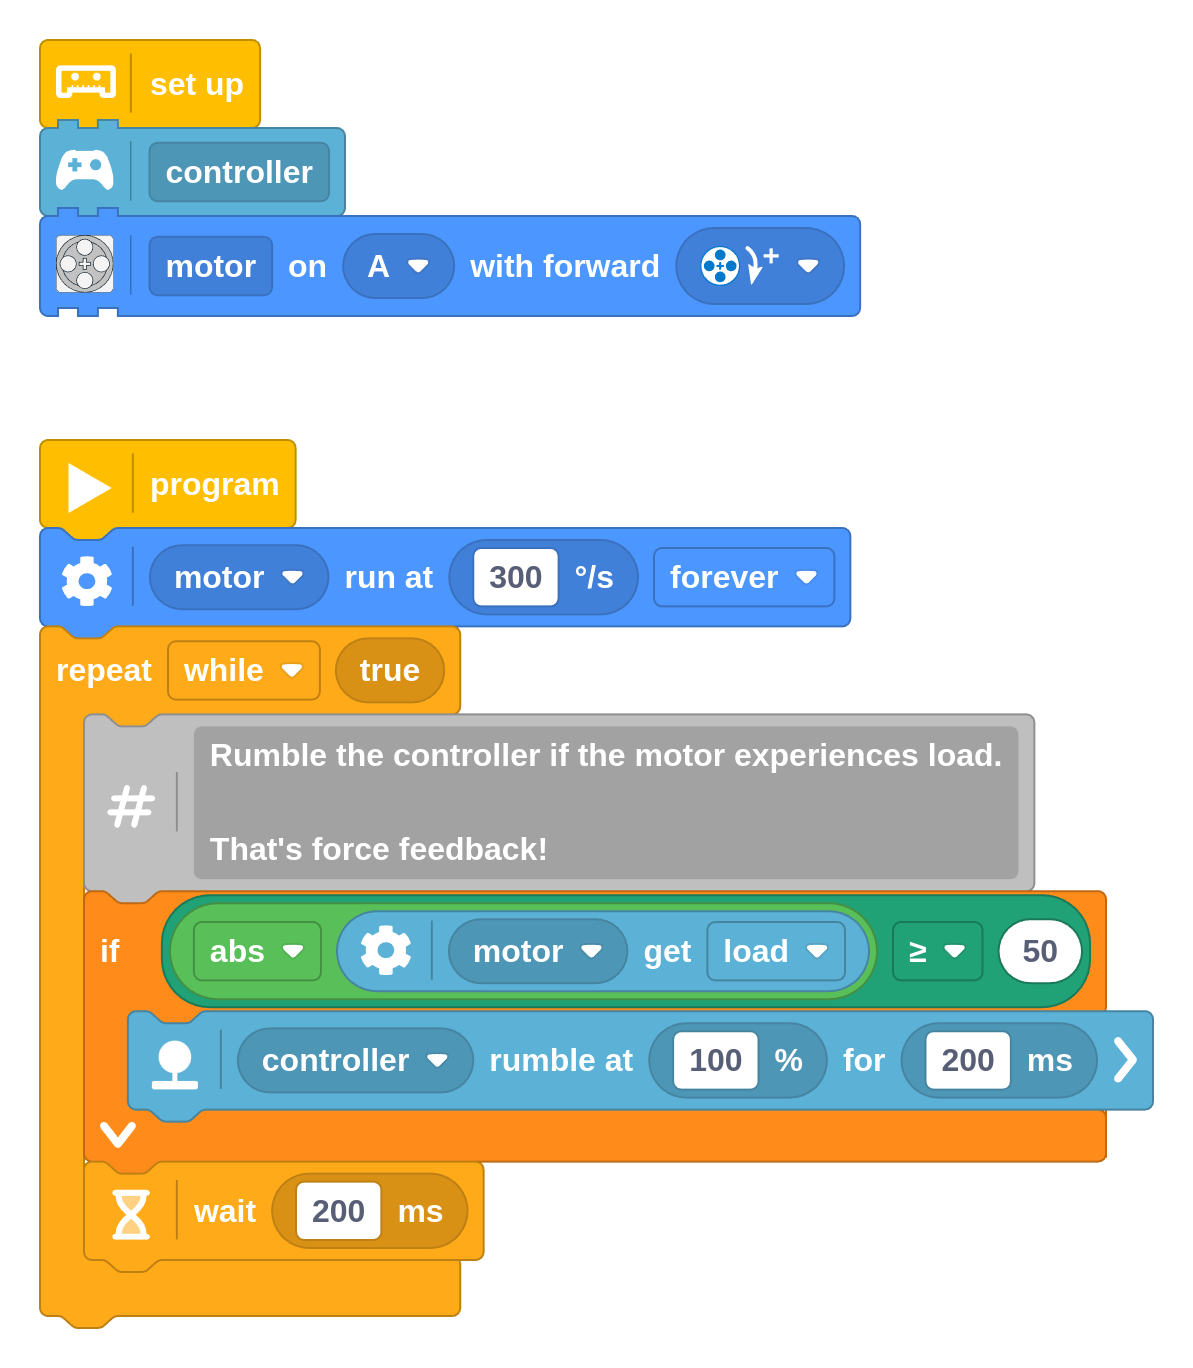
In this example, we used the rumble block to make the controller vibrate when
the motor experiences load.
You can make the Xbox Controller rumble to create force feedback.
Controlling the actuators separately
The Xbox Controller has 4 builtin actuators. There is a big and a small one in
the main handles, and two smaller ones behind the triggers.
If you give a single power value, the left and right main actuators will both
rumble with that power. For more fine-grained control, set power as a list of
four values: this controls the left main actuator, right main actuator, left
trigger actuator, and the right trigger actuator, respectively.
For example, (50, 0, 100, 0) makes the left main actuator run at half power
and the left trigger at full power:
You can also adjust the duration and the number of times the rumble repeats:
You can also run this project as a Python (MicroPython) program. The following
code was generated from the block program above.
To run it, create a new empty Python program in Pybricks and copy the code into
it.
frompybricks.iodevicesimportXboxControllerfrompybricks.parametersimportDirection,Port,Stopfrompybricks.pupdevicesimportMotorfrompybricks.toolsimportwait# Set up all devices.
motor=Motor(Port.A,Direction.CLOCKWISE)controller=XboxController()# The main program starts here.
motor.run(300)whileTrue:# Rumble the controller if the motor experiences load.
# That's force feedback!
ifabs(motor.load())>=50:controller.rumble(100,200)wait(200)
Python representation of the block program.
]]>Laurens Valk