Our story and mission
There are numerous tools and apps for learning to program, but what makes a good learning experience? And what about the robotics aspect? How do you make it simple, but not simplistic? How do you bridge the gap between basic Sratch-like coding to real-world Python programming in a way that makes sense?
With many years of experience in teaching coding and robotics, we aimed to build the best possible tool for playing and coding with smart LEGO bricks. Instead of creating a whole new app for every new product, we took a step back and designed a unified play experience, in such a way that it is easy to get started without putting a limit on what the user can do.
This page explains how Pybricks was designed. You won’t need this introduction to get started. We’ll cover each of these topics in the chapters that follow.
A fresh take on coding and robotics
To give you a sense of how Pybricks was designed, we’ll highlight just a few design decisions we’ve made along the way. By designing Pybricks specifically for physical robots (instead of 2D computer screens), we were able to avoid some of the pitfalls found in other block-based languages. And by starting with the firmware and Python layer underneath, we were able to make a gradual transition in the learning process, rather than having Python as a completely disconnected experience.
Robotics, Scratch, and events
The Scratch language is incredible in many ways, but it was designed for computers, not robots. The difference may seem subtle at first, but it makes a big difference for coding and teaching in practice.
On a computer with on-screen graphics, everything happens instantly. You click a button and a sprite instantly appears on a new position. This works intuitively with events. When this happens, do that immediately.
Robots don’t work that way. Like humans, robots take time to complete actions. Moving a motor takes time. Playing a sound takes time. Even pressing-and-releasing a button takes some time — there’s no such thing as an instant button click event.
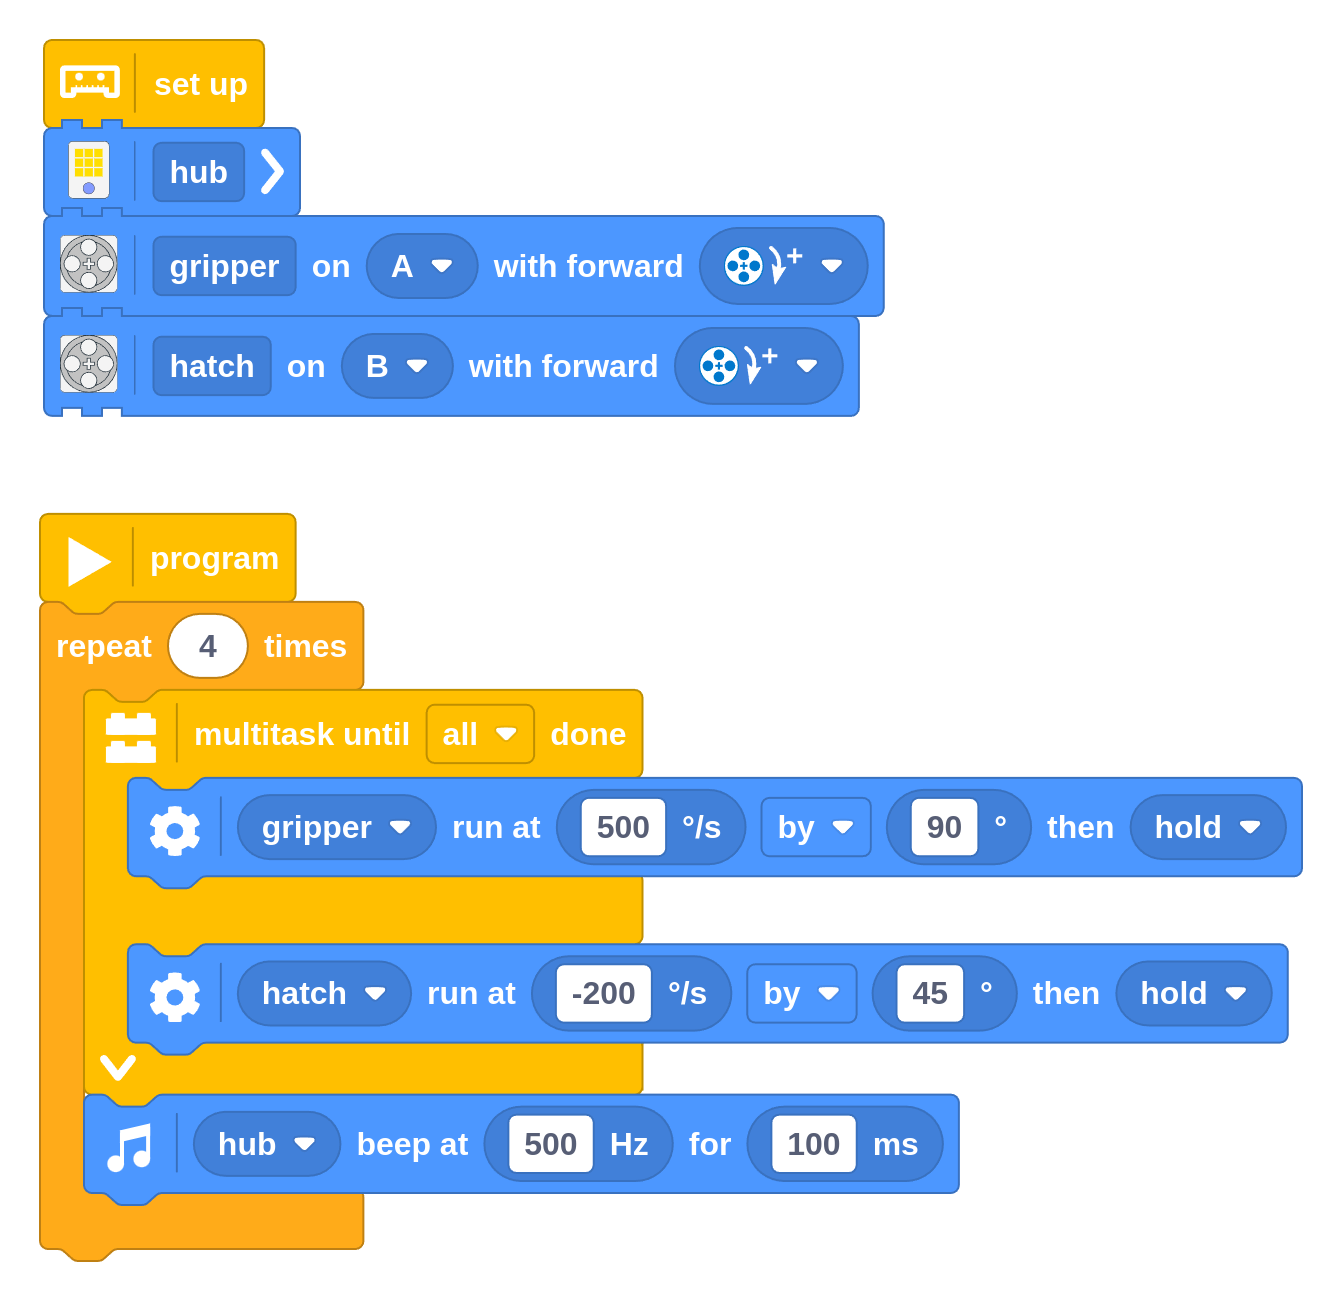
Consider the following seemingly trivial problem: You want to complete two different motor moves at the same time. When both of these are complete, you want to play a sound and repeat the whole process four times.
The original Scratch does not have to deal with this kind of problem. On-screen graphics just appear immediately so explicit multitasking isn’t needed. So when you do it in LEGO apps based on Scratch, you don’t have the right tools for this. You’d have to make multiple event stacks, so-called broadcasts and lock variables to make the stacks wait on each other. This is very complicated to get right for beginners, and it isn’t necessarily the best way to learn.
In Pybricks, there is a dedicated block to run two or more tasks at the same time, and continue with the rest of the program when all tasks are complete. The completed program below is very easy to follow as a result.
Measurements and the real world
A robot’s environment isn’t perfect. Wheels might slip, or a sensor might occasionally give the wrong value. Speeds don’t change instantly, but there is an acceleration phase that depends on how the robot is built.
To make such things more practical to deal with, we use measurable units for
everything in Pybricks wherever possible. For example, you can steer your robot
at a specified number of degrees per second, instead of steering at an
arbitrary 75%.
To further encourage students to carefully measure and design their robot, we’ve added an explicit set up section to the block coding interface. Students can describe how their robot is built and specify which devices are plugged in.
This may take an extra minute to get used to at first, but it’s a big time saver in the long run, especially for medium to large programs. The rest of the program can refer to these motors and sensors by name rather than port code, which is much less error prone. It makes collaboration between team members easier too, since they can instantly see what their code does.
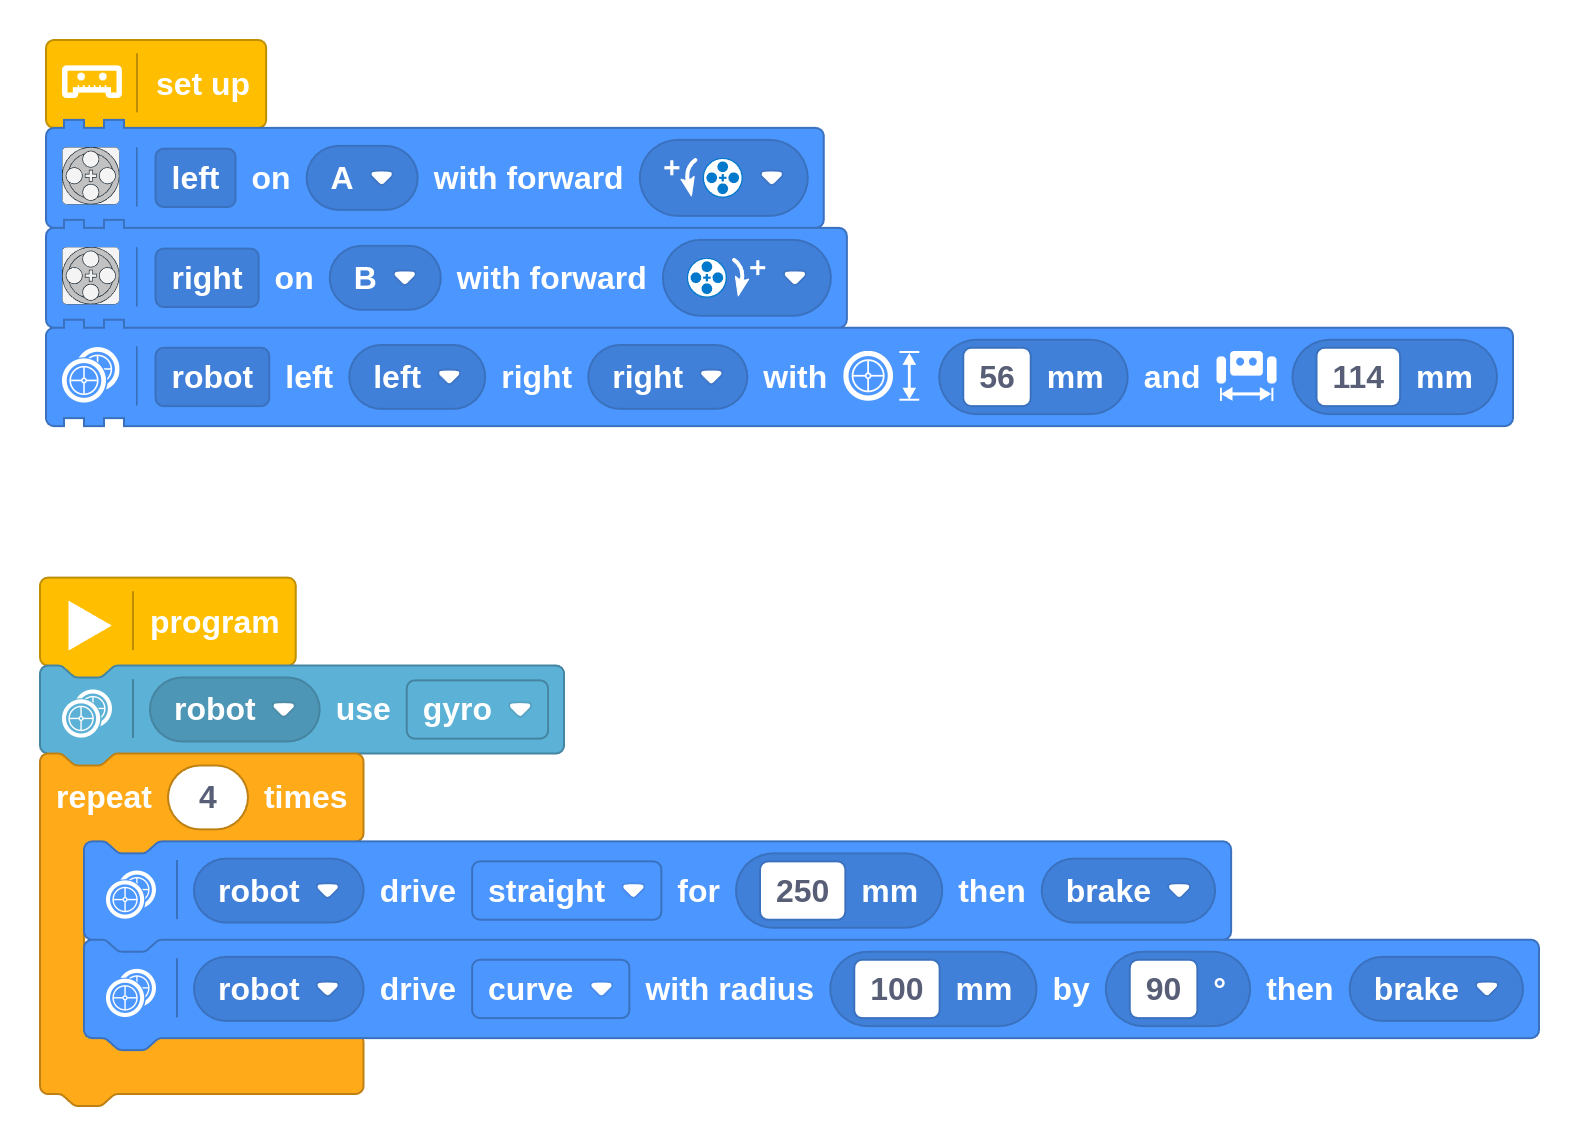
By setting up the drive base width and wheel diameter, users can navigate the robot in measurable units too. You specify the number of degrees that the robot turns, rather than how much the wheels turn.
Some might argue that this takes a way a learning opportunity, but we would argue the opposite. We often saw students guess and tune the number of motor degrees in other apps to get it just right, rather than measure and calculate the required amount. By abstracting some of the math away, we want to encourage students to do real measurements and learn how each configuration parameter affects performance.
For example, you can tell it to drive 250 mm but you might measure it to be
243 mm in your design in practice. This let students investigate why this
happens instead of fiddling with an arbitrary degree value until it works for a
particular robot. Did a wheel slip? Did the tyre compress under weight,
effectively making the diameter smaller?
This allows students to focus on the real challenges of navigation with sensors and problem solving. Senior teams can still learn about π and do everything manually if they want to go for even better performance.
A good Python experience
Like Scratch, Python was originally designed for computers rather than physical
systems. Out of the box, code runs sequentially from top to bottom, one thing
at a time. To fix it, Python introduced so-called asynchronous multitasking
with with the async and await syntax. This lets you do something else while
another task is waiting to complete. It works great, but it is also completely
unsuitable for beginning coders.
This creates a conundrum: do you create a Python experience that avoids this to make it easier, but limits what you can do? This was done in the MINDSTORMS app and the SPIKE V2.0 app, and almost all other apps that generate code from blocks. Or do you overcome these limits but make it much harder? This is the approach of the SPIKE V3.0 app.
In Pybricks, you can do both. You can start with the simpler sequential code. You can gradually add asynchronous code when you are ready to use it. This is true even if you use block-based coding. It generates sequential code that is easy to learn from, but it adds the required additional code when you use a multi-tasking block or multiple start blocks.
Compare sequential and asynchronous Python code
If you don’t need multitasking, you can write synchronous (sequential) code, which is easier for beginners:
from pybricks.hubs import PrimeHub
from pybricks.parameters import Port
from pybricks.pupdevices import Motor

# Set up all devices.
hub = PrimeHub()
gripper = Motor(Port.A)
hatch = Motor(Port.B)

for count in range(4):
    # Move the gripper, then the hatch, then play a sound.
    gripper.run_angle(speed=500, rotation_angle=90)
    hatch.run_angle(speed=-200, rotation_angle=45)
    hub.speaker.beep(frequency=500, duration=100)
Advanced users can use asynchronous code. This corresponds to the multi-tasking example made with blocks above:
from pybricks.hubs import PrimeHub
from pybricks.parameters import Port
from pybricks.pupdevices import Motor
from pybricks.tools import multitask, run_task, wait

# Set up all devices.
hub = PrimeHub()
gripper = Motor(Port.A)
hatch = Motor(Port.B)

async def main():
    for count in range(4):
        # Simultaneously run the gripper and move the hatch.
        await multitask(
          gripper.run_angle(speed=500, rotation_angle=90),
          hatch.run_angle(speed=-200, rotation_angle=45)
        )
        # Then play a sound.
        await hub.speaker.beep(frequency=500, duration=100)

# Run main asynchronous task.
run_task(main())
Besides this conceptual difference, you’ll also find many smaller but helpful differences. For example, you can see the code being generated live as you move blocks around. You can see documentation for all available Python functions, not just the LEGO-specific functions. You can use the interactive terminal, and you can split your program into multiple modules to better organize it like real Python code. Advanced users can also use Pybricks in their favorite local code editor. Finally, you’ll get descriptive error messages to help you debug your projects.
Life long learning with LEGO®
We have always been huge fans of the LEGO® product and brand. It has been a big part of our childhood, and it’s very exciting to pass on these learning experiences to the next generation. But if only the best is good enough, there is some real work left to do.
You can still build with physical bricks from decades ago, but certain “smart” bricks sold as recently as 2020 are getting almost impossible to use as their corresponding LEGO® apps are discontinued from the Google and Apple app stores.
This leaves you with an expensive paperweight, and it creates a big pile of e-waste worldwide. We think The LEGO Group can do much better! With Pybricks, we’re hoping to demonstrate that this can certainly be done.
Since we’ve open sourced our Pybricks firmware and Python coding interface, it should be possible to use Pybricks long after the official products and their apps retire. This ensures you can still play with your smart LEGO® bricks decades from now, just as you can with any other physical brick!
Who are we?
Pybricks has contributors all around the world. The core team consists of Laurens Valk (Netherlands) and David Lechner (USA), who combine years of teaching, coding, and LEGO experience to help you learn how to code and build robots.
We encourage you to ask technical questions on our community forum, but feel free to drop us an email for other matters.