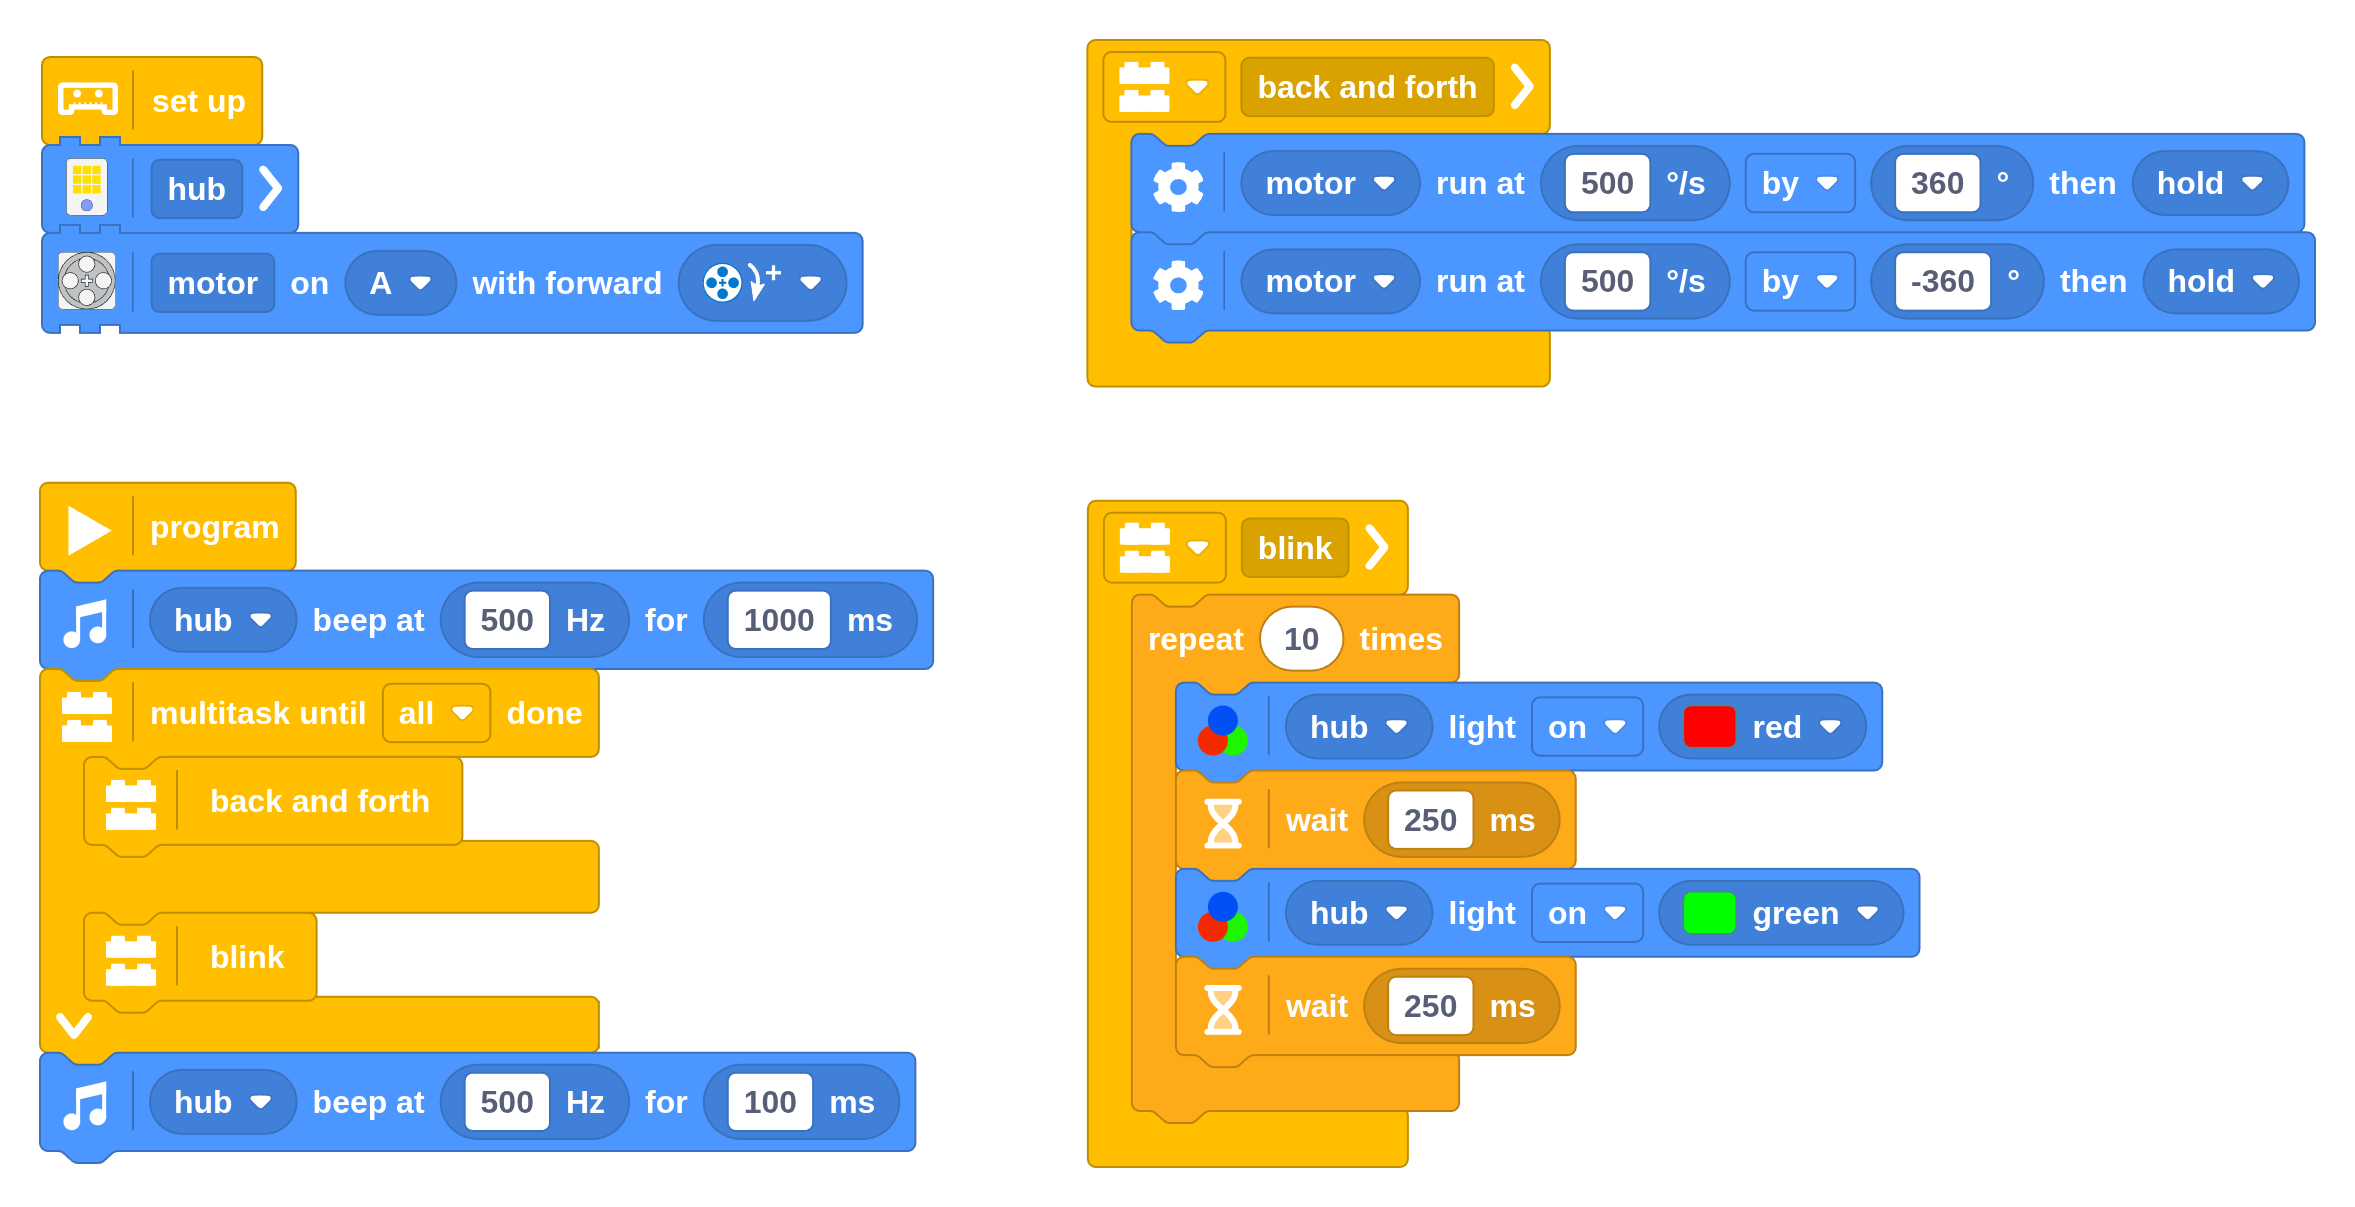
Basic multitasking
Previously, you’ve learned to use Repeat blocks, Wait blocks and Task blocks to change in which order your blocks run. In all of these cases, there was just one action going on at a time.
Sometimes it is useful to do two or more things at the same time, known as multitasking. For example, a truck plays a warning sound while driving backwards, and a robotic arm moves multiple joints at once for smoother motion.
You can do this in your program using multiple Start blocks or using the Multitask block, as shown below. You’ll learn to use both techniques in this section.
Start blocks begin
at the same time.
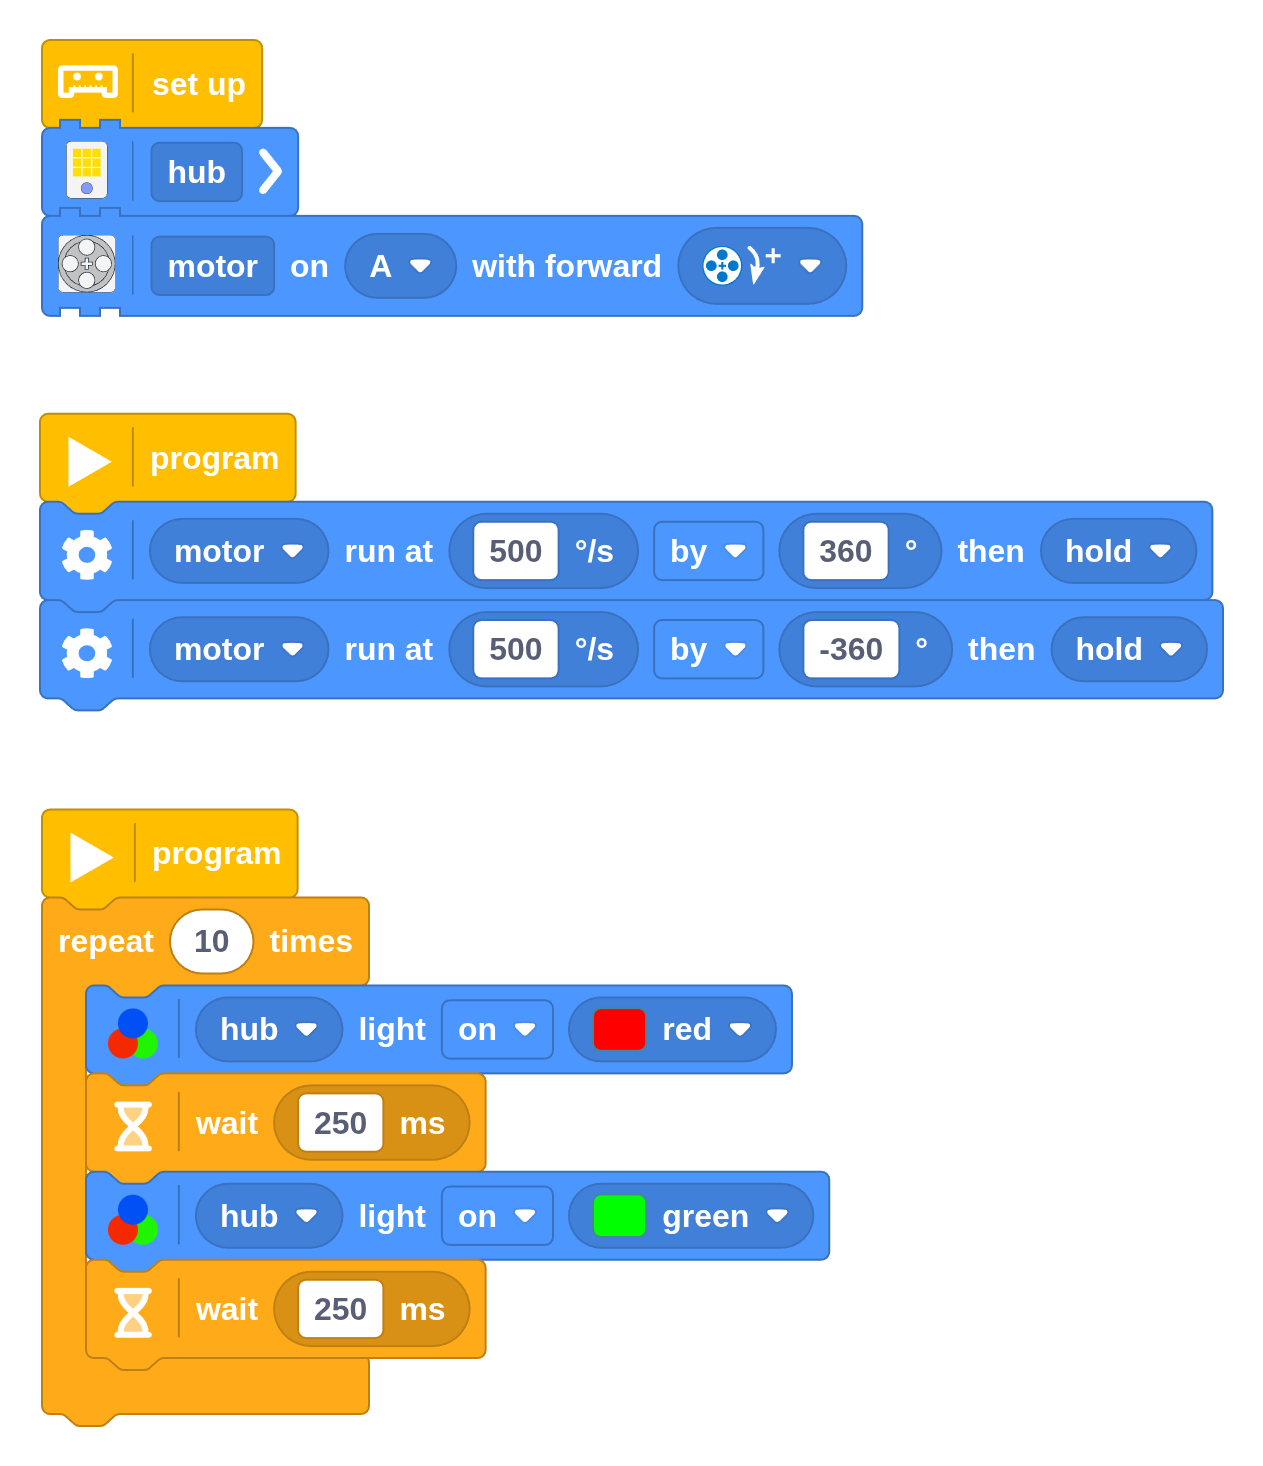
Using multiple Start blocks
The simplest way to do two things at once is by placing another Start block on the canvas. All Start blocks begin running at the same time, no matter where they are placed. The program ends when both have finished running all blocks that are attached to them.
Consider the following example, which runs one motor back and forth under one Start block. At the same time, a Repeat Times block under another Start block blinks the hub light red and green ten times.
In principle, you can add as many Start blocks to the canvas as you like. In practice, your program can become unwieldy and hard to follow if you add too many. For many applications, the Multitask block is more effective, as you’ll see next.
Challenge #4.3.A: In formation ⸺ Set up the left and right motor. Make them both move 1000 degrees at the same time. Compare the resulting movement to that of a fully configured Drive Base Drive block. In both cases, what happens if you block one wheel but not the other?
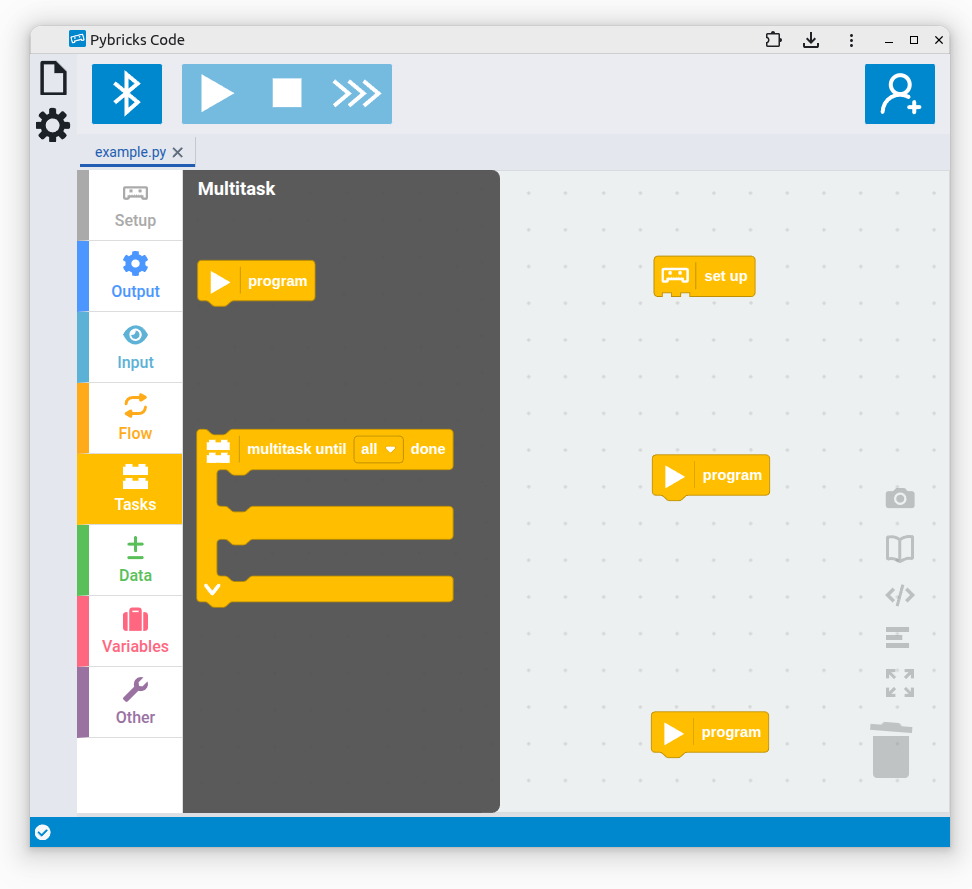
Using the Multitask block
When your program arrives at a Multitask block, it will run two or more stacks of blocks placed within it at the same time. Consider the following example, which runs one motor back and forth. At the same time, a Repeat Times block blinks the hub light red and green ten times.
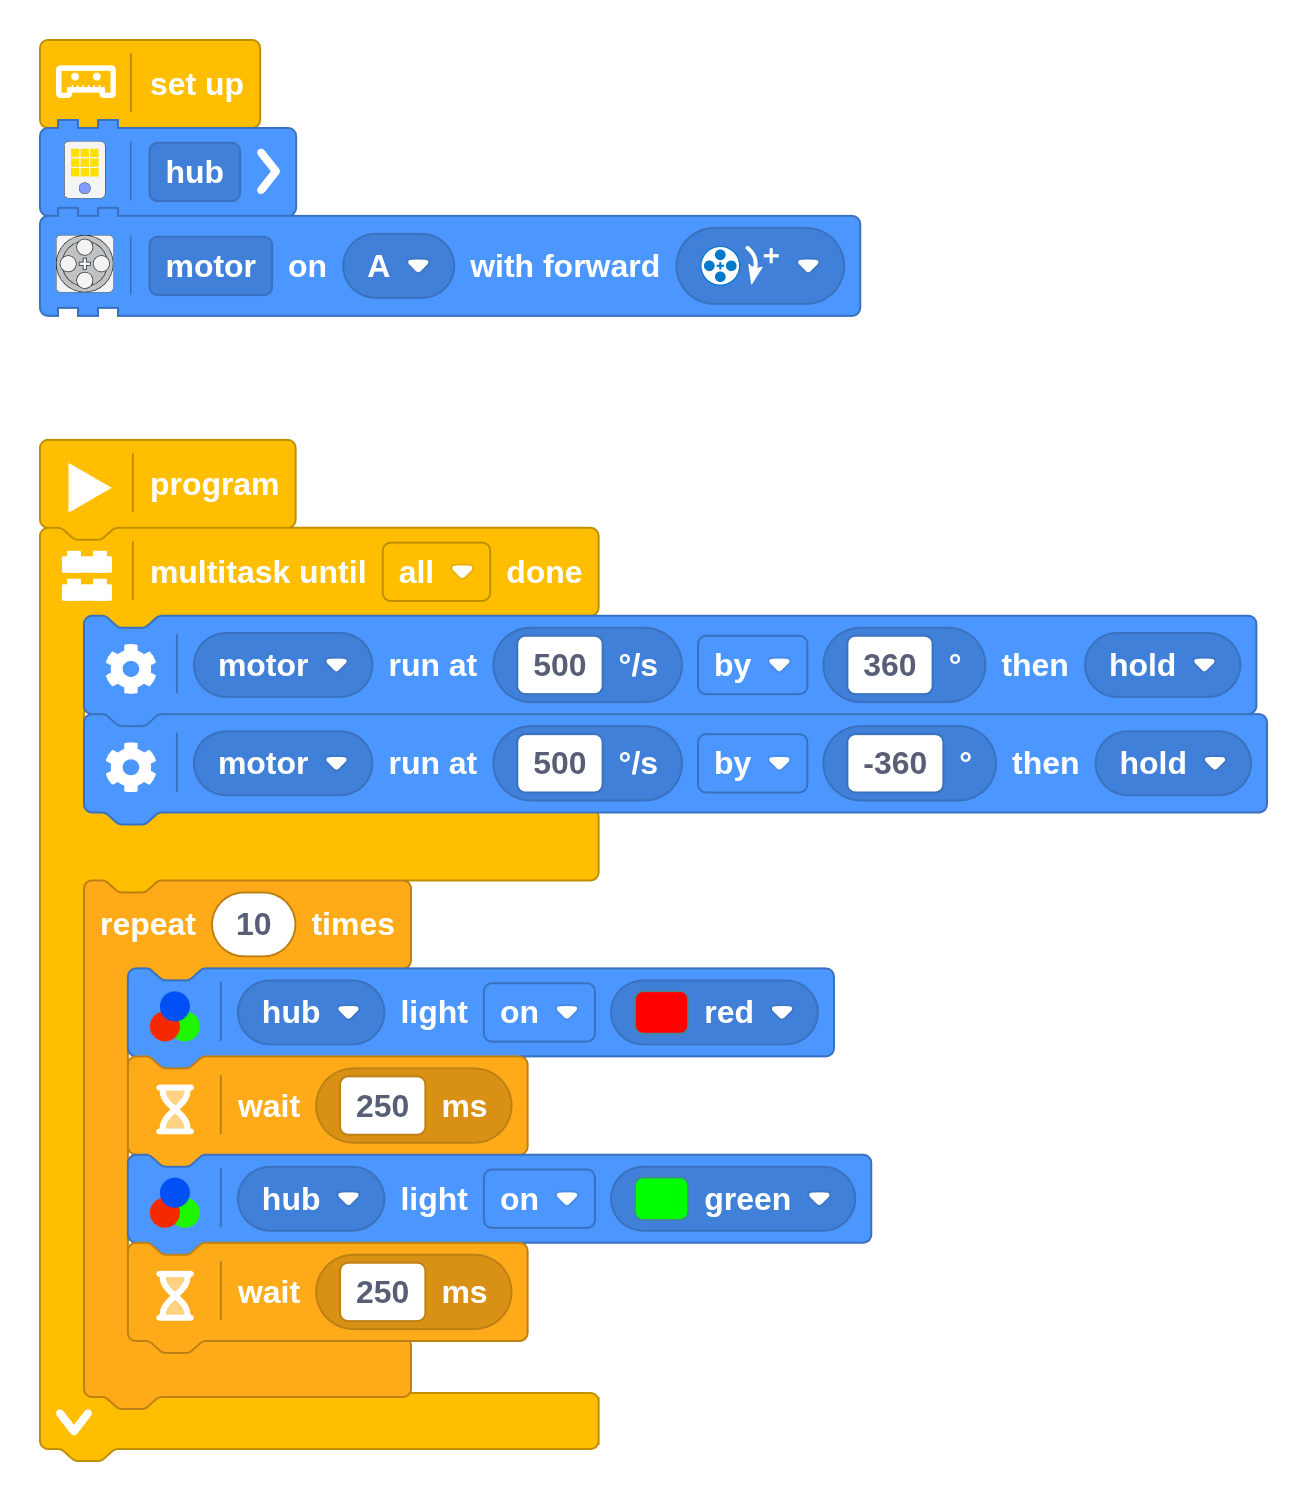
If this sounds familiar, that’s because this example is identical to the program with two Start blocks from before. What’s the point then, you ask? To see why it is useful, add two sound blocks to create the following example:
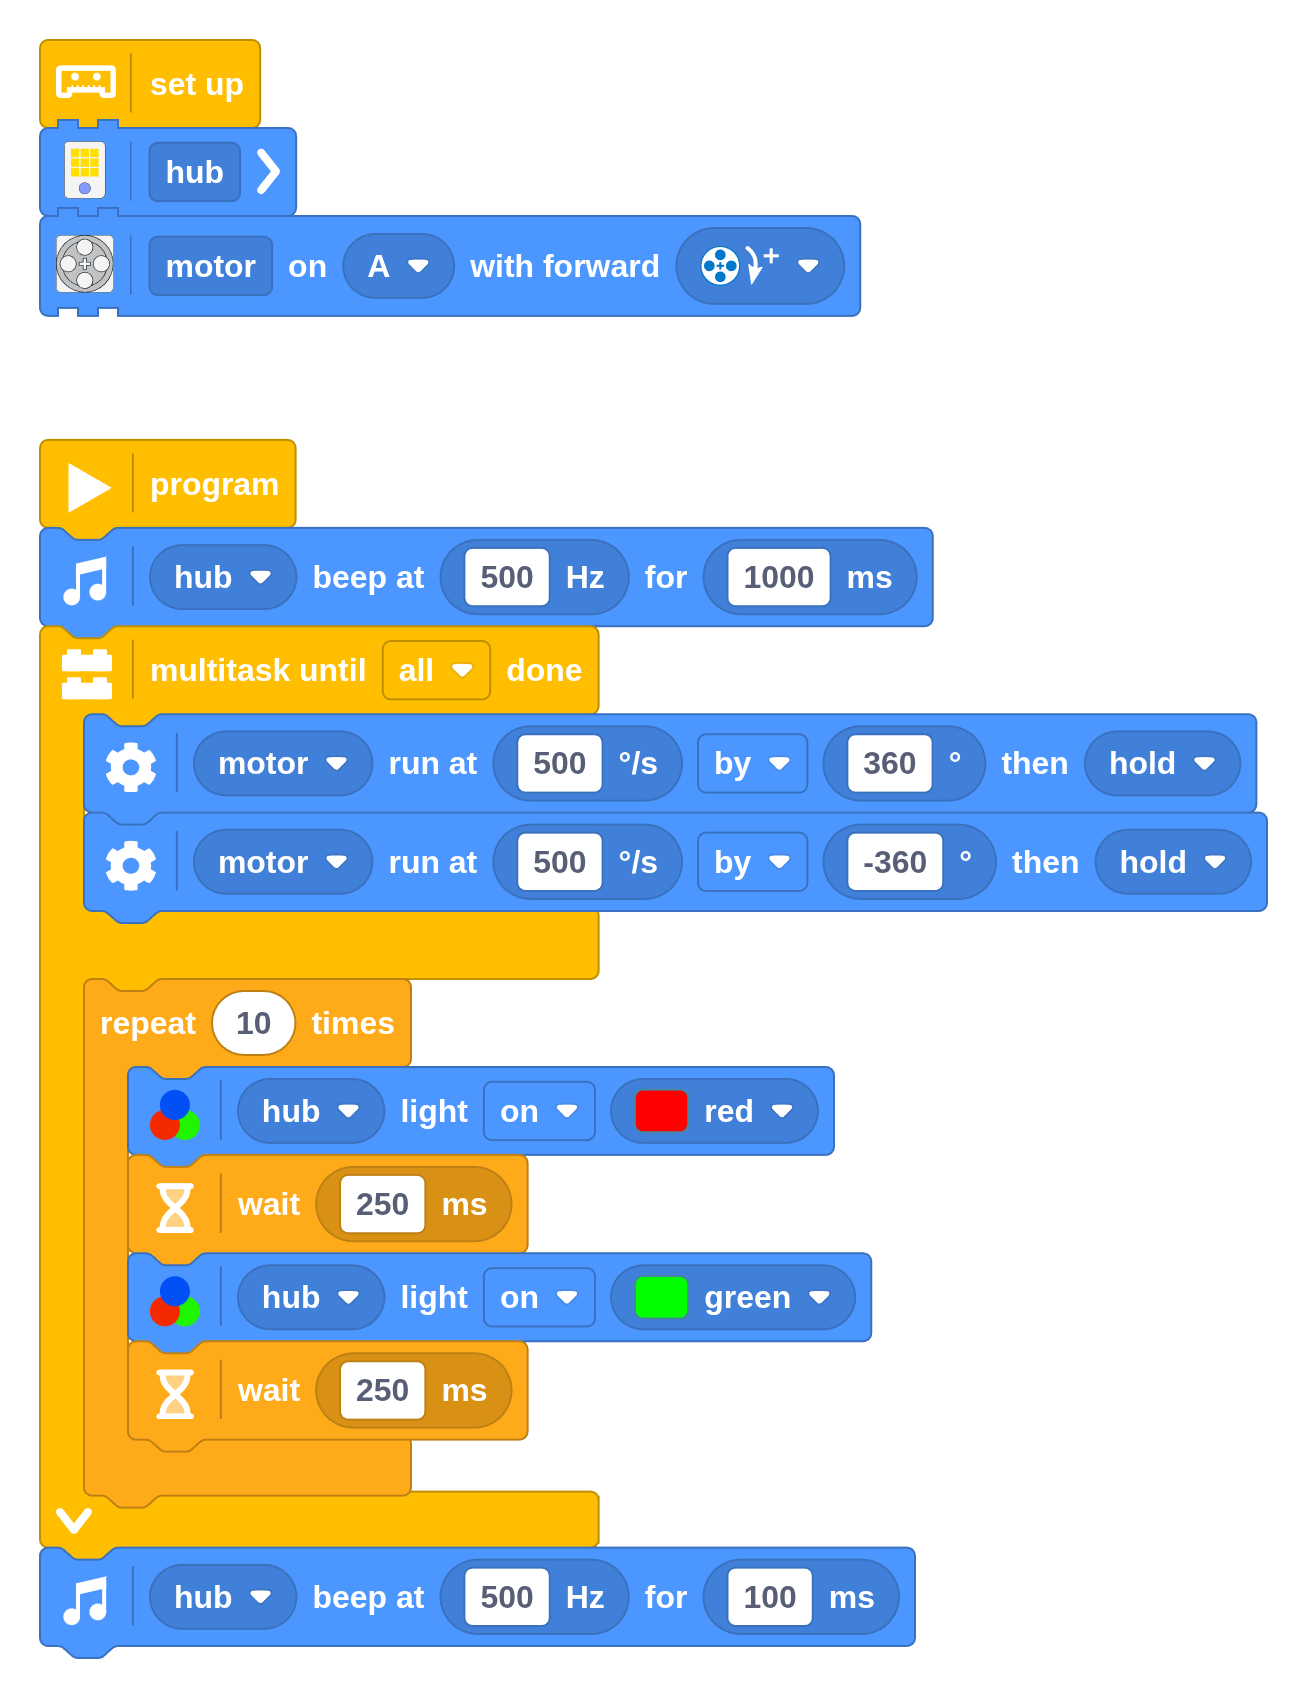
Now the robot plays a sound, runs the motor back and forth while blinking the light as before, and then plays another sound. As trivial as this may look, you might be surprised to learn that this is much harder to build using two Start blocks.
This is where the Multitask block shines. It can do the same as multiple Start blocks, but you can choose where and when to use it like any other block, rather than only use it at the very beginning of your program.
If you’ve programmed with Scratch before, you might have used Broadcast blocks to make multiple stacks of blocks wait on each other. You don’t need these with the Multitask block. This keeps programs much simpler and easier to follow, especially when they grow bigger.
Challenge #4.3.B: On the dance floor ⸺ Open one of your previous programs that made the robot drive in a square. Use Multitask blocks to make it blink a blue light on the straights and blink a red light while making turns. Can you make it play a well known melody along the way?
Multitasking with Task Caller blocks
You can organize your program differently by placing the blocks for back and forth movement and the blinking light in their own Task blocks. Then you can place their Task Caller blocks in the Multitask block, as shown below.
Organizing your code like this is a matter of preference, but it can be helpful for large programs. Now you can see why this block is called the Multitask block: it runs multiple tasks at once. Under the hood, this program is identical to the previous example.
Challenge #4.3.C: On the dance floor, with tasks ⸺ Open the solution that you made for Challenge #4.3.B. Create a Task block that drives straight for 250 mm while blinking a blue light. Unlike the previous example, this time place the Multitask block inside the Task block. Next, create another Task block for turning 90 degrees while blinking a red light. Once you have created these, where should you place the Task Caller blocks to make the robot drive in a square while blinking the lights as instructed?
Running more than two tasks
You can run more than two tasks at once by expanding the Multitask block using the v-shaped symbol at the bottom. For example, your robot could simultaneously rotate a motor, play a sound, blink a light, and print some text, as shown below.
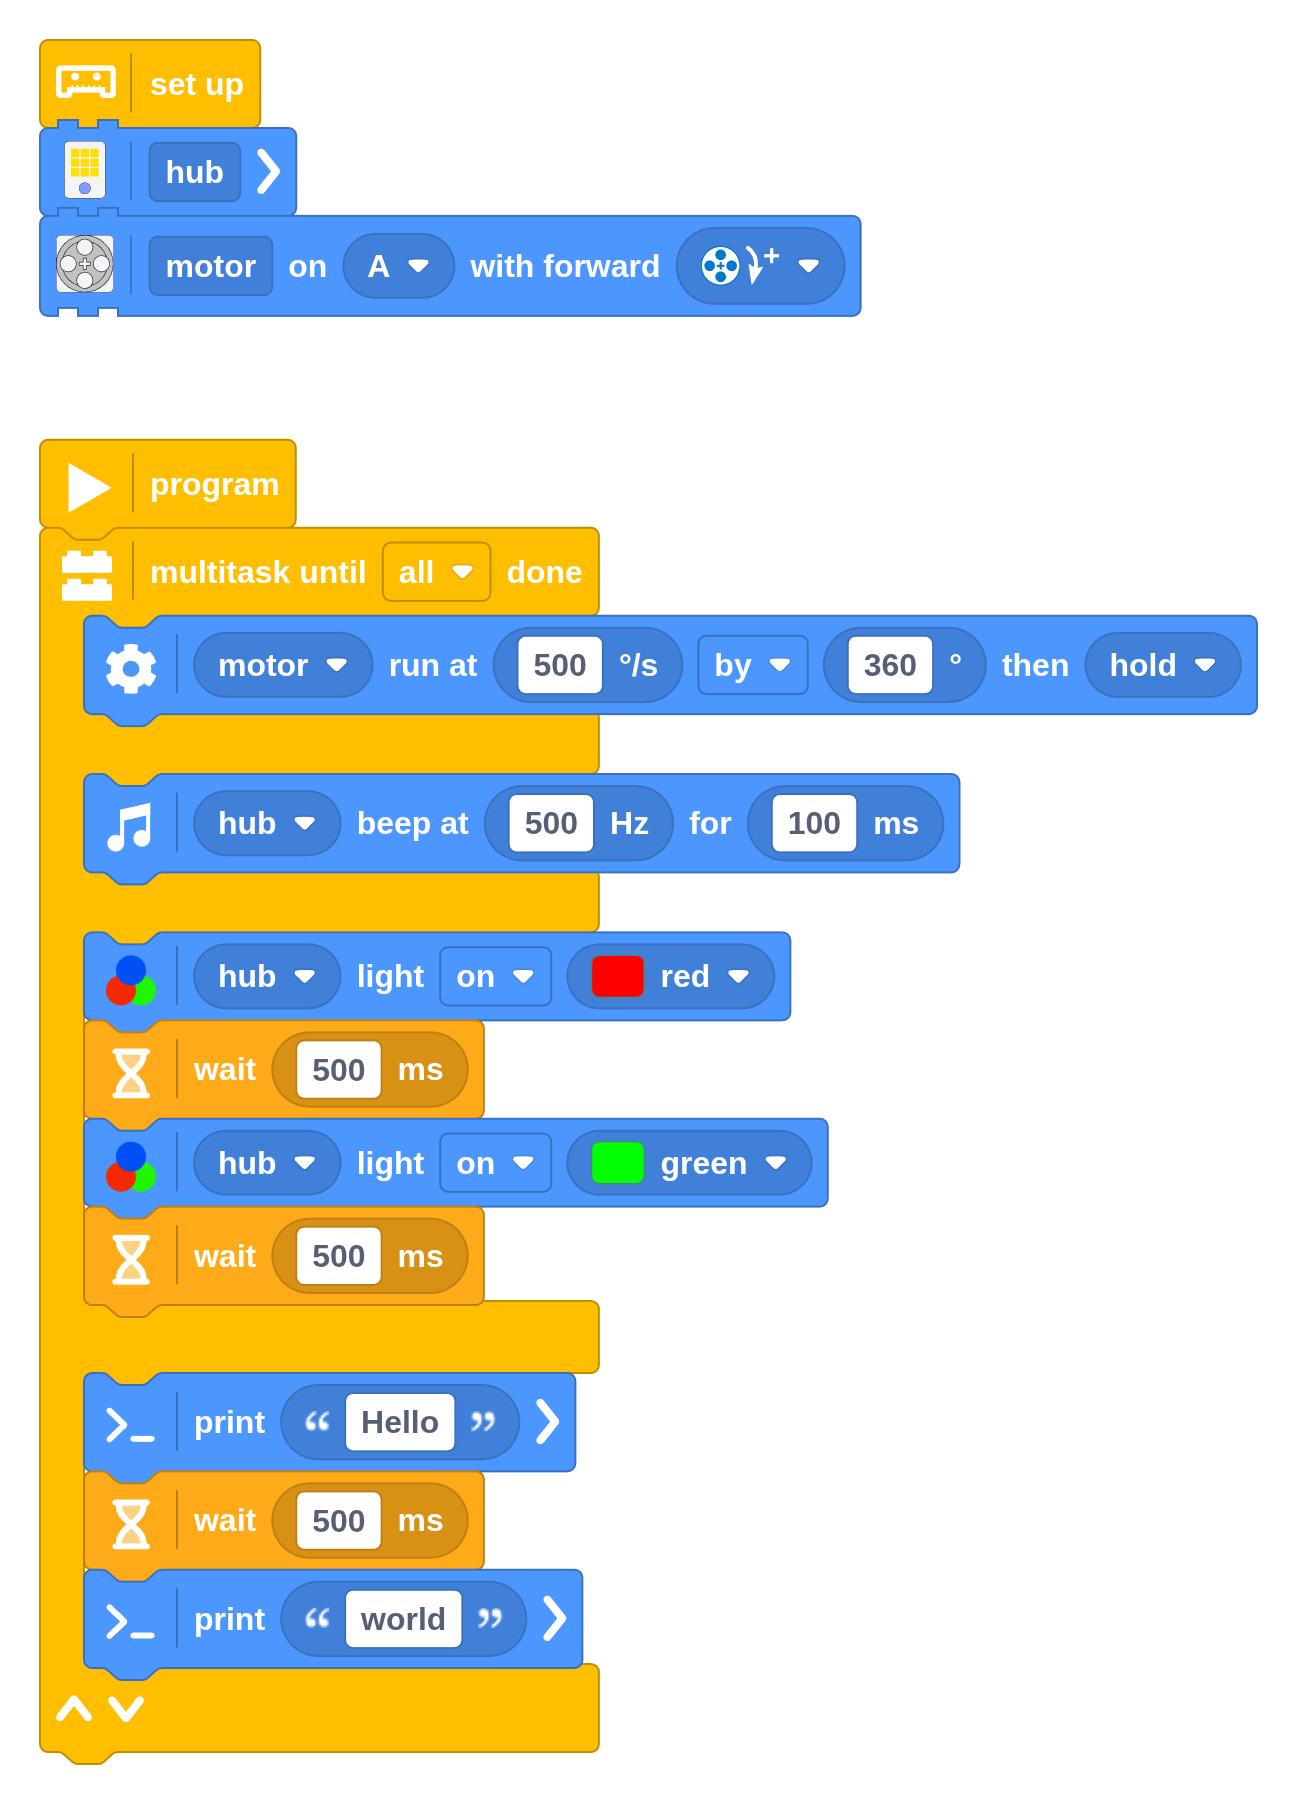
Challenge #4.3.D: Multitasking efficiently ⸺ The previous example runs four tasks (stacks of blocks) at the same time. However, you can achieve the same result with just three tasks. Click the ʌ icon on the Multitask block to reduce it to three tasks. You will see two Print blocks and a Wait block floating on the canvas. Where should you place them to achieve the same result as before? You may delete blocks if needed.
Conflicting resources
While your robot can multitask many different actions, it cannot do two conflicting things at once. For example, it can’t run the same motor forwards and backwards at the same time, just as you can’t walk forward and backward at the same time. More precisely, your robot can’t use the same resource from two places at once. Besides motors, this also includes sensors and the hub speaker.
The following program won’t work right. The mistake here is quite obvious, but it can be easier to miss in a big program. In general, you should avoid having two stacks of blocks running at the same time that try to use the same resource.

Note that this is not a coding limitation since it is impossible even in theory. Instead, it means that you should rethink your program design. It usually helps to describe in words what your program should do. Write it down or describe it to a friend, and see if it still makes sense!
In contrast, controlling two different motors from different tasks at the same time is fine. It is also fine to change the hub light color or print text from multiple places. These are very quick operations, so the hub can ensure that they don’t clash.