Hub to hub communication using data broadcasting
This project shows how you can exchange data between two Pybricks hubs.
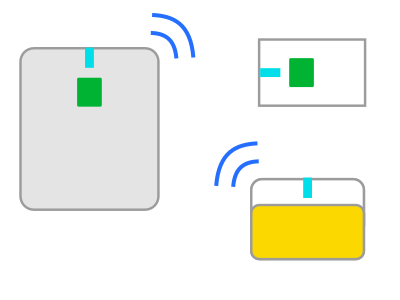
Data broadcasting
When a Bluetooth device is on but not yet connected to anything, it typically broadcasts (advertises) some information about itself. This tells you what it can do before you connect.
For example, Bluetooth earphones will advertise that they can play music, so that your phone knows what to look for when it scans for speaker devices.
By constantly changing what information the hub advertises, we can broadcast small amounts of information to nearby devices that are scanning for this information.
This means that any number of nearby hubs can receive the broadcasted message without having to set up a connection. This can be quite convenient, but you can only broadcast small amounts of information at once, as explained below.
Channels
In Pybricks, all broadcasting data is assigned a channel. This helps you tell data apart when multiple hubs are broadcasting at the same time. For example, one hub might be broadcasting tilt sensor data on channel 1 while another hub broadcasts measurements on channel 2.
To prepare the hub to send and receive data with these channels, you initialize the hub class as follows:
# Prepare the hub for sending.
hub = ThisHub(broadcast_channel=1)
# Prepare the hub for receiving.
hub = ThisHub(observe_channels=[1, 2])
Sending and receiving data
You can send data like this:
# Get a tuple of pitch and roll angles.
data = sensor.tilt()

# Send it out to anyone listening.
hub.ble.broadcast(data)
On another hub, you can receive it as follows:
# Try to read previously received tilt data.
data = hub.ble.observe(1)

# Check if there was any data yet:
if data is not None:
    # There was, so let's print it.
    pitch, roll = data
    print(pitch, roll)
When sending data, your values will be automatically encoded into a format
suitable for broadcasting. You can send integers (1, -5, …), floats
(1.0 -5.3, …), booleans (True, False), strings ("example"), bytes
(b"\x00\x02") or tuples thereof.
Running the example programs
The following examples shows the broadcasting feature in action to provide wireless bidirectional communication.
One hub sends tilt sensor data to control a driving vehicle. The vehicle sends back a distance measurement to show a warning light for nearby obstacles:
Run this program on the sender
You can use any hub with any type of sensor. For example, you could use the built-in tilt sensor of the Technic Hub, Prime Hub, Essential Hub, or the Inventor Hub. Alternatively, you could build your own remote control that uses motors as input dials.
If you don’t have the Color Light Matrix, you can delete the lines that reference it, or adjust it to control the built-in hub light.
from pybricks.hubs import ThisHub
from pybricks.pupdevices import TiltSensor, ColorLightMatrix
from pybricks.parameters import Port, Color
from pybricks.tools import wait

# Initialize the hub for sending and receiving.
hub = ThisHub(broadcast_channel=1, observe_channels=[2])

# Initialize the devices.
lights = ColorLightMatrix(Port.A)
sensor = TiltSensor(Port.B)

while True:
    # Read pitch and roll.
    pitch, roll = sensor.tilt()

    # Make small tilt zero.
    if abs(pitch) < 5:
        pitch = 0
    if abs(roll) < 5:
        roll = 0

    # Send the data!
    hub.ble.broadcast((pitch, roll))

    # Check for distance data.
    data = hub.ble.observe(2)

    # If there was distance data, use it to activate the light.
    if data is not None and data < 500:
        lights.on(Color.RED)
    else:
        lights.off()

    # Wait some time.
    wait(10)
Run this program on the vehicle
You can use any hub with any type of motors. If you don’t have a distance sensor, you can delete the lines that make use of the Ultrasonic Sensor.
from pybricks.hubs import ThisHub
from pybricks.pupdevices import Motor, UltrasonicSensor
from pybricks.parameters import Port, Direction
from pybricks.robotics import DriveBase
from pybricks.tools import wait

# Initialize the hub for sending and receiving.
hub = ThisHub(broadcast_channel=2, observe_channels=[1])

# Initialize the drive base.
left_motor = Motor(Port.A, Direction.COUNTERCLOCKWISE)
right_motor = Motor(Port.B)
drive_base = DriveBase(
    left_motor, right_motor, wheel_diameter=56, axle_track=112
)

# Initialize the distance sensor.
sensor = UltrasonicSensor(Port.C)

while True:
    # Receive tilt data.
    data = hub.ble.observe(1)

    if data is not None:
        # If we received it, start driving.
        pitch, roll = data
        drive_base.drive(speed=pitch * 8, turn_rate=roll * 3)
    else:
        # If we lost the signal, stop.
        drive_base.stop()

    # Send the distance data
    hub.ble.broadcast(sensor.distance())

    # Wait some time.
    wait(10)
Known issue: Slow communication while connected to computer
If the hub is still connected to the computer, the bluetooth chip is quite busy and data broadcasting may be slow. Especially on the Technic Hub and the City Hub. On the Move Hub, it cannot broadcast at all while connected to the PC.
To work around it, just load the program onto the hub and disconnect from your computer. You can just restart the program with the hub button.
This project was submitted by Pybricks and Nard Strijbosch.